跳到主要内容

9 篇博文 含有标签「release」

查看所有标签

· 阅读需 3 分钟
Feodor Fitsner

We just released Flet 0.1.65 which is adding a bunch of mobile-optimized controls, fixing some bugs and introducing a new layout control - ResponsiveRow.

ResponsiveRow control

ResponsiveRow borrows the idea of grid layout from Bootstrap web framework.

ResponsiveRow allows aligning child controls to virtual columns. By default, a virtual grid has 12 columns, but that can be customized with ResponsiveRow.columns property.

Similar to expand property every control now has col property which allows specifying how many columns a control should span. For examle, to make a layout consisting of two columns spanning 6 virtual columns each:

import flet as ft

ft.ResponsiveRow([
ft.Column(col=6, controls=ft.Text("Column 1")),
ft.Column(col=6, controls=ft.Text("Column 2"))
])

ResponsiveRow is "responsive" because it can adapt the size of its children to a changing screen (page, window) size. col property in the example above is a constant number which means the child will span 6 columns for any screen size.

If ResponsiveRow's child doesn't have col property specified it spans the maximum number of columns.

col can be configured to have a different value for specific "breakpoints". Breakpoints are named dimension ranges:

BreakpointDimension
xs<576px
sm≥576px
md≥768px
lg≥992px
xl≥1200px
xxl≥1400px

For example, the following example collapses content into a single column on a mobile device and takes two columns on larger screens:

import flet as ft

ft.ResponsiveRow([
ft.Column(col={"sm": 6}, controls=ft.Text("Column 1")),
ft.Column(col={"sm": 6}, controls=ft.Text("Column 2"))
])

Here is more elaborate example of responsive layout:
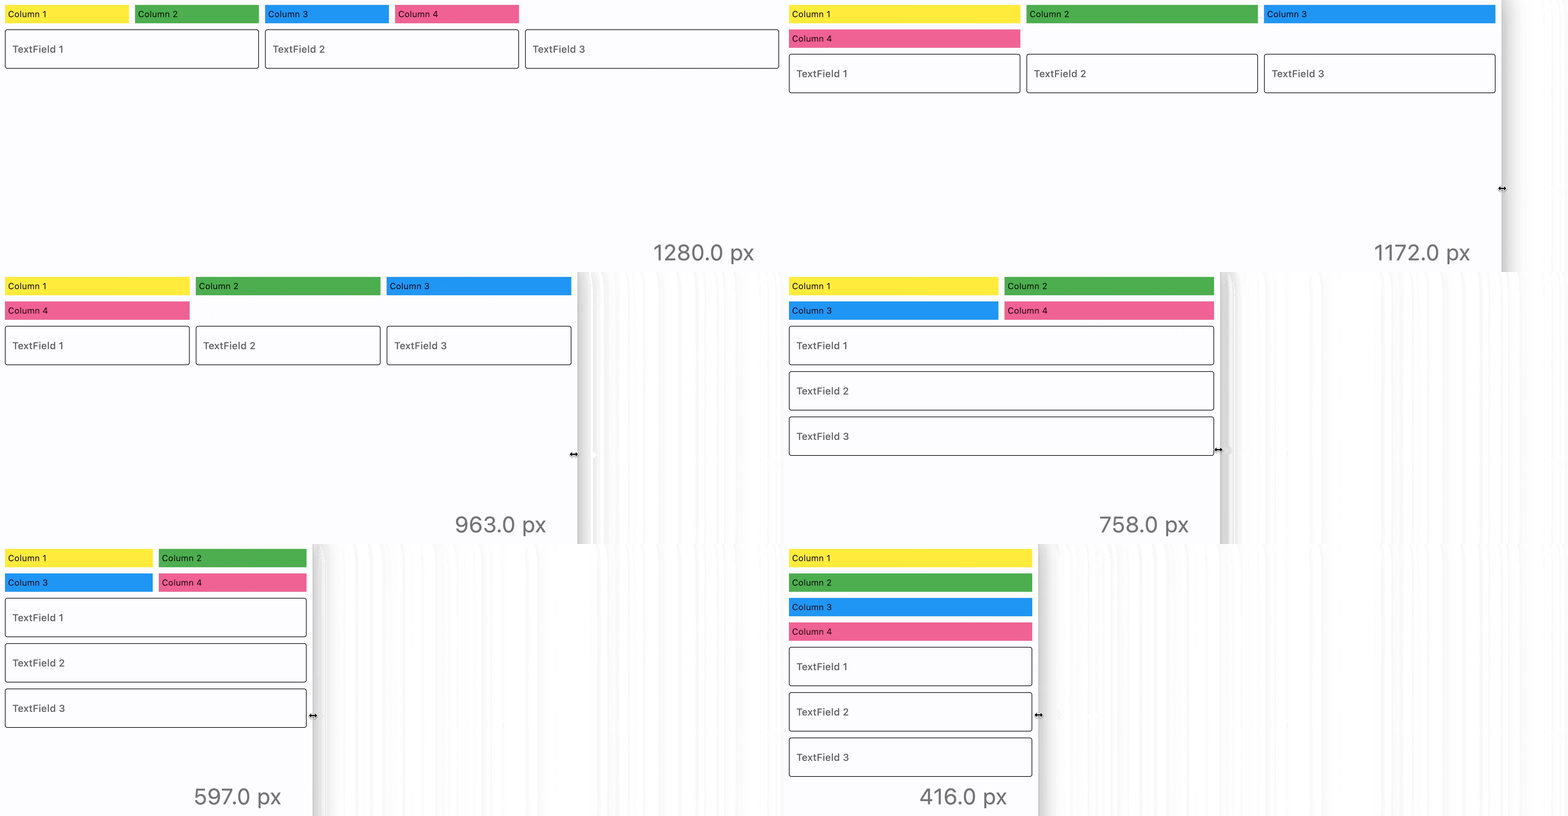
import flet as ft

def main(page: ft.Page):
def page_resize(e):
pw.value = f"{page.width} px"
pw.update()

page.on_resize = page_resize

pw = ft.Text(bottom=50, right=50, style="displaySmall")
page.overlay.append(pw)
page.add(
ft.ResponsiveRow(
[
ft.Container(
ft.Text("Column 1"),
padding=5,
bgcolor=ft.colors.YELLOW,
col={"sm": 6, "md": 4, "xl": 2},
),
ft.Container(
ft.Text("Column 2"),
padding=5,
bgcolor=ft.colors.GREEN,
col={"sm": 6, "md": 4, "xl": 2},
),
ft.Container(
ft.Text("Column 3"),
padding=5,
bgcolor=ft.colors.BLUE,
col={"sm": 6, "md": 4, "xl": 2},
),
ft.Container(
ft.Text("Column 4"),
padding=5,
bgcolor=ft.colors.PINK_300,
col={"sm": 6, "md": 4, "xl": 2},
),
],
),
ft.ResponsiveRow(
[
ft.TextField(label="TextField 1", col={"md": 4}),
ft.TextField(label="TextField 2", col={"md": 4}),
ft.TextField(label="TextField 3", col={"md": 4}),
],
run_spacing={"xs": 10},
),
)
page_resize(None)

ft.app(target=main)

ResponsiveRow docs, example.

Other new controls

This release adds new visual and non-visual controls requested by Flet community and also required to build UI of the upcoming Flet Studio.

BottomSheet

Shows a modal Material Design bottom sheet:
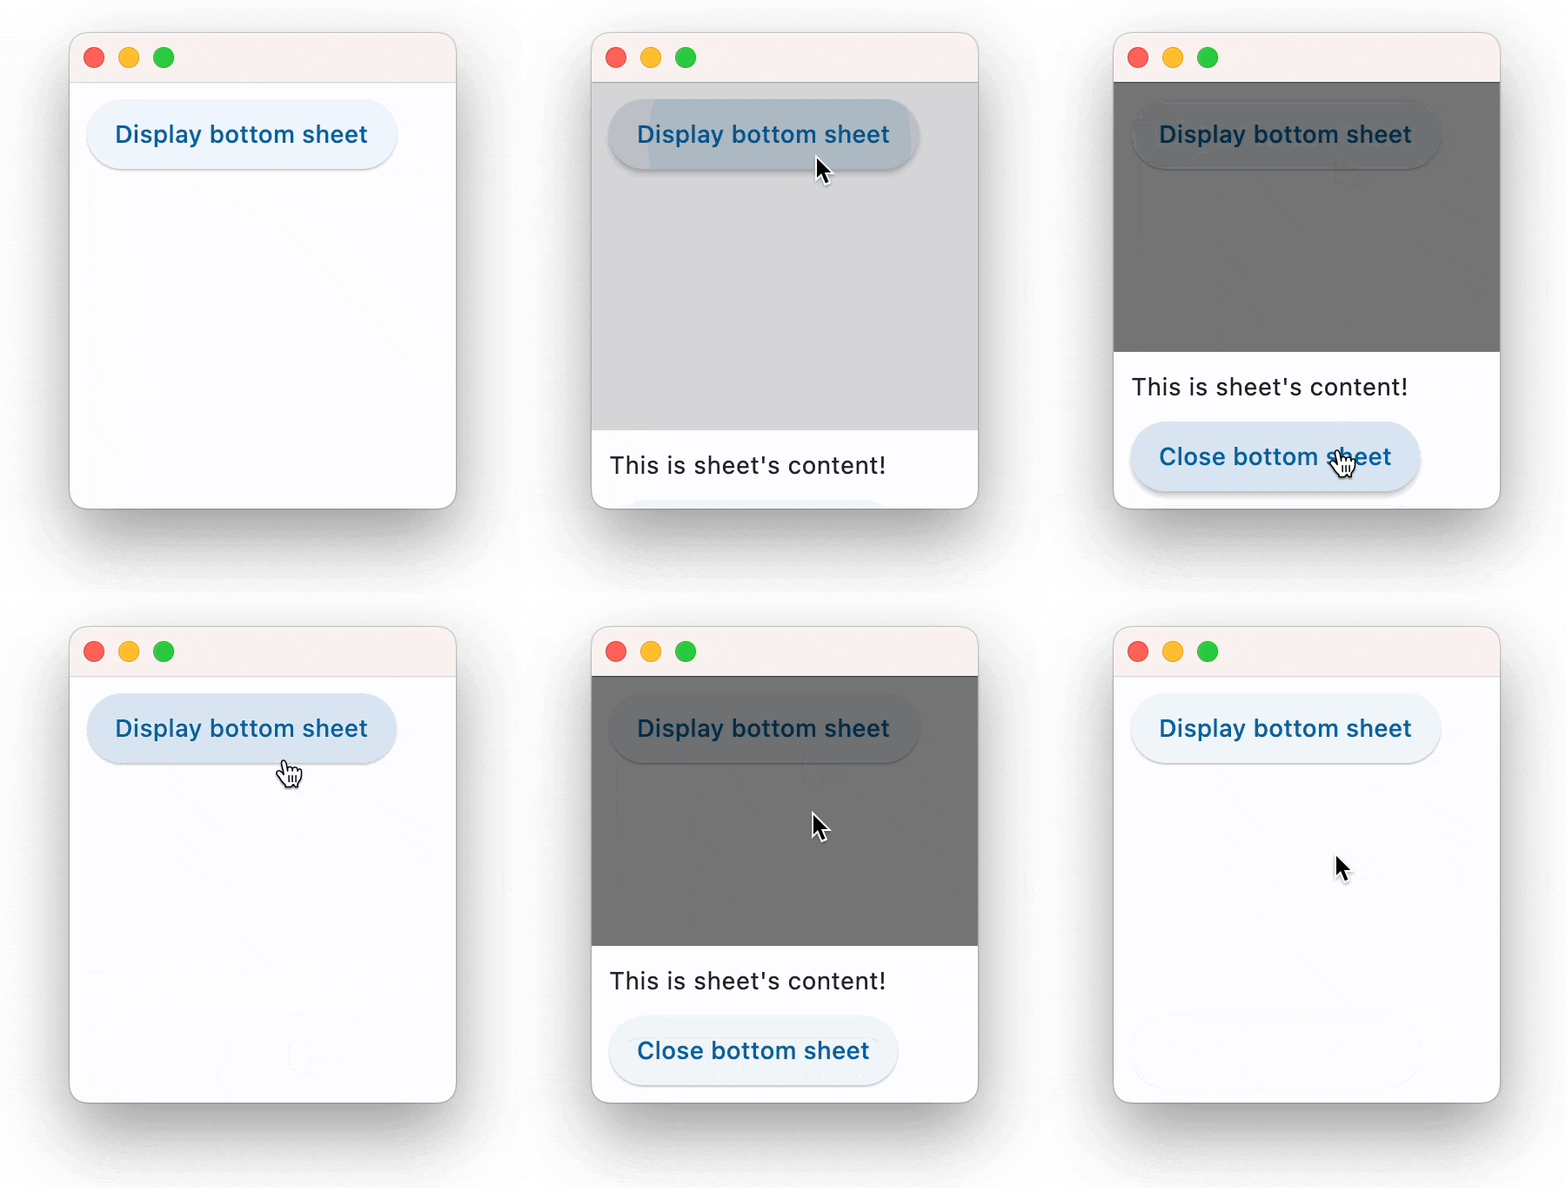
BottomSheet docs, example.

Bottom Navigation bar which offers a persistent and convenient way to switch between primary destinations in an app:
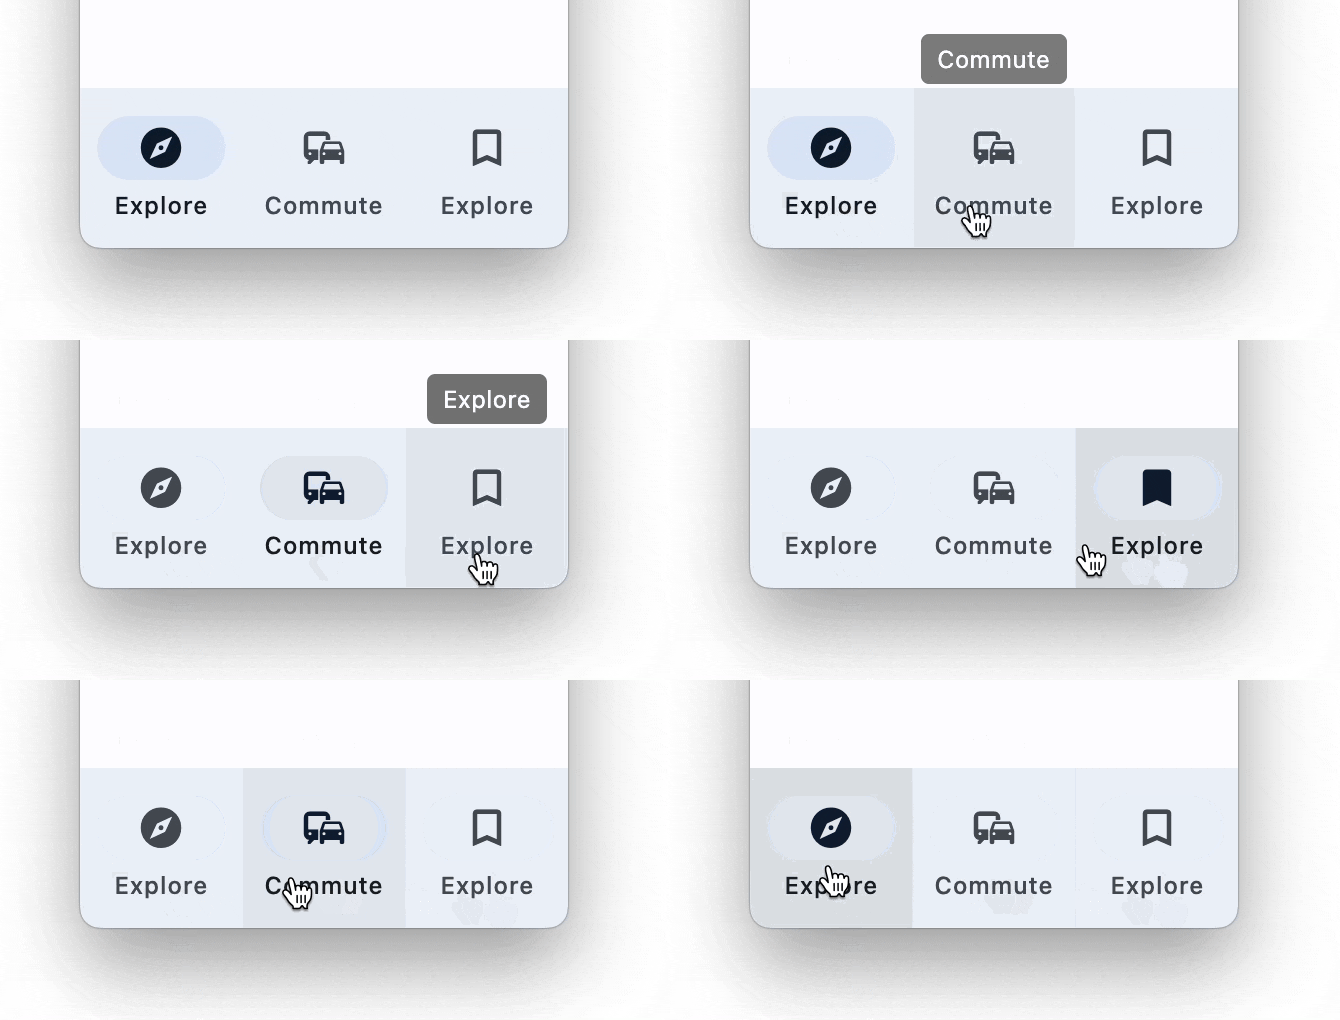
NavigationBar docs, example.

Tooltip

A tooltip control:

Tooltip docs, example.

HapticFeedback

Allows access to the haptic feedback (clicks and vibrates) interface on the device.

HapticFeedback docs.

ShakeDetector

A control to detect phone shakes. Based on shake widget.

ShakeDetector docs.

Other improvements

Markdown code syntax highlight
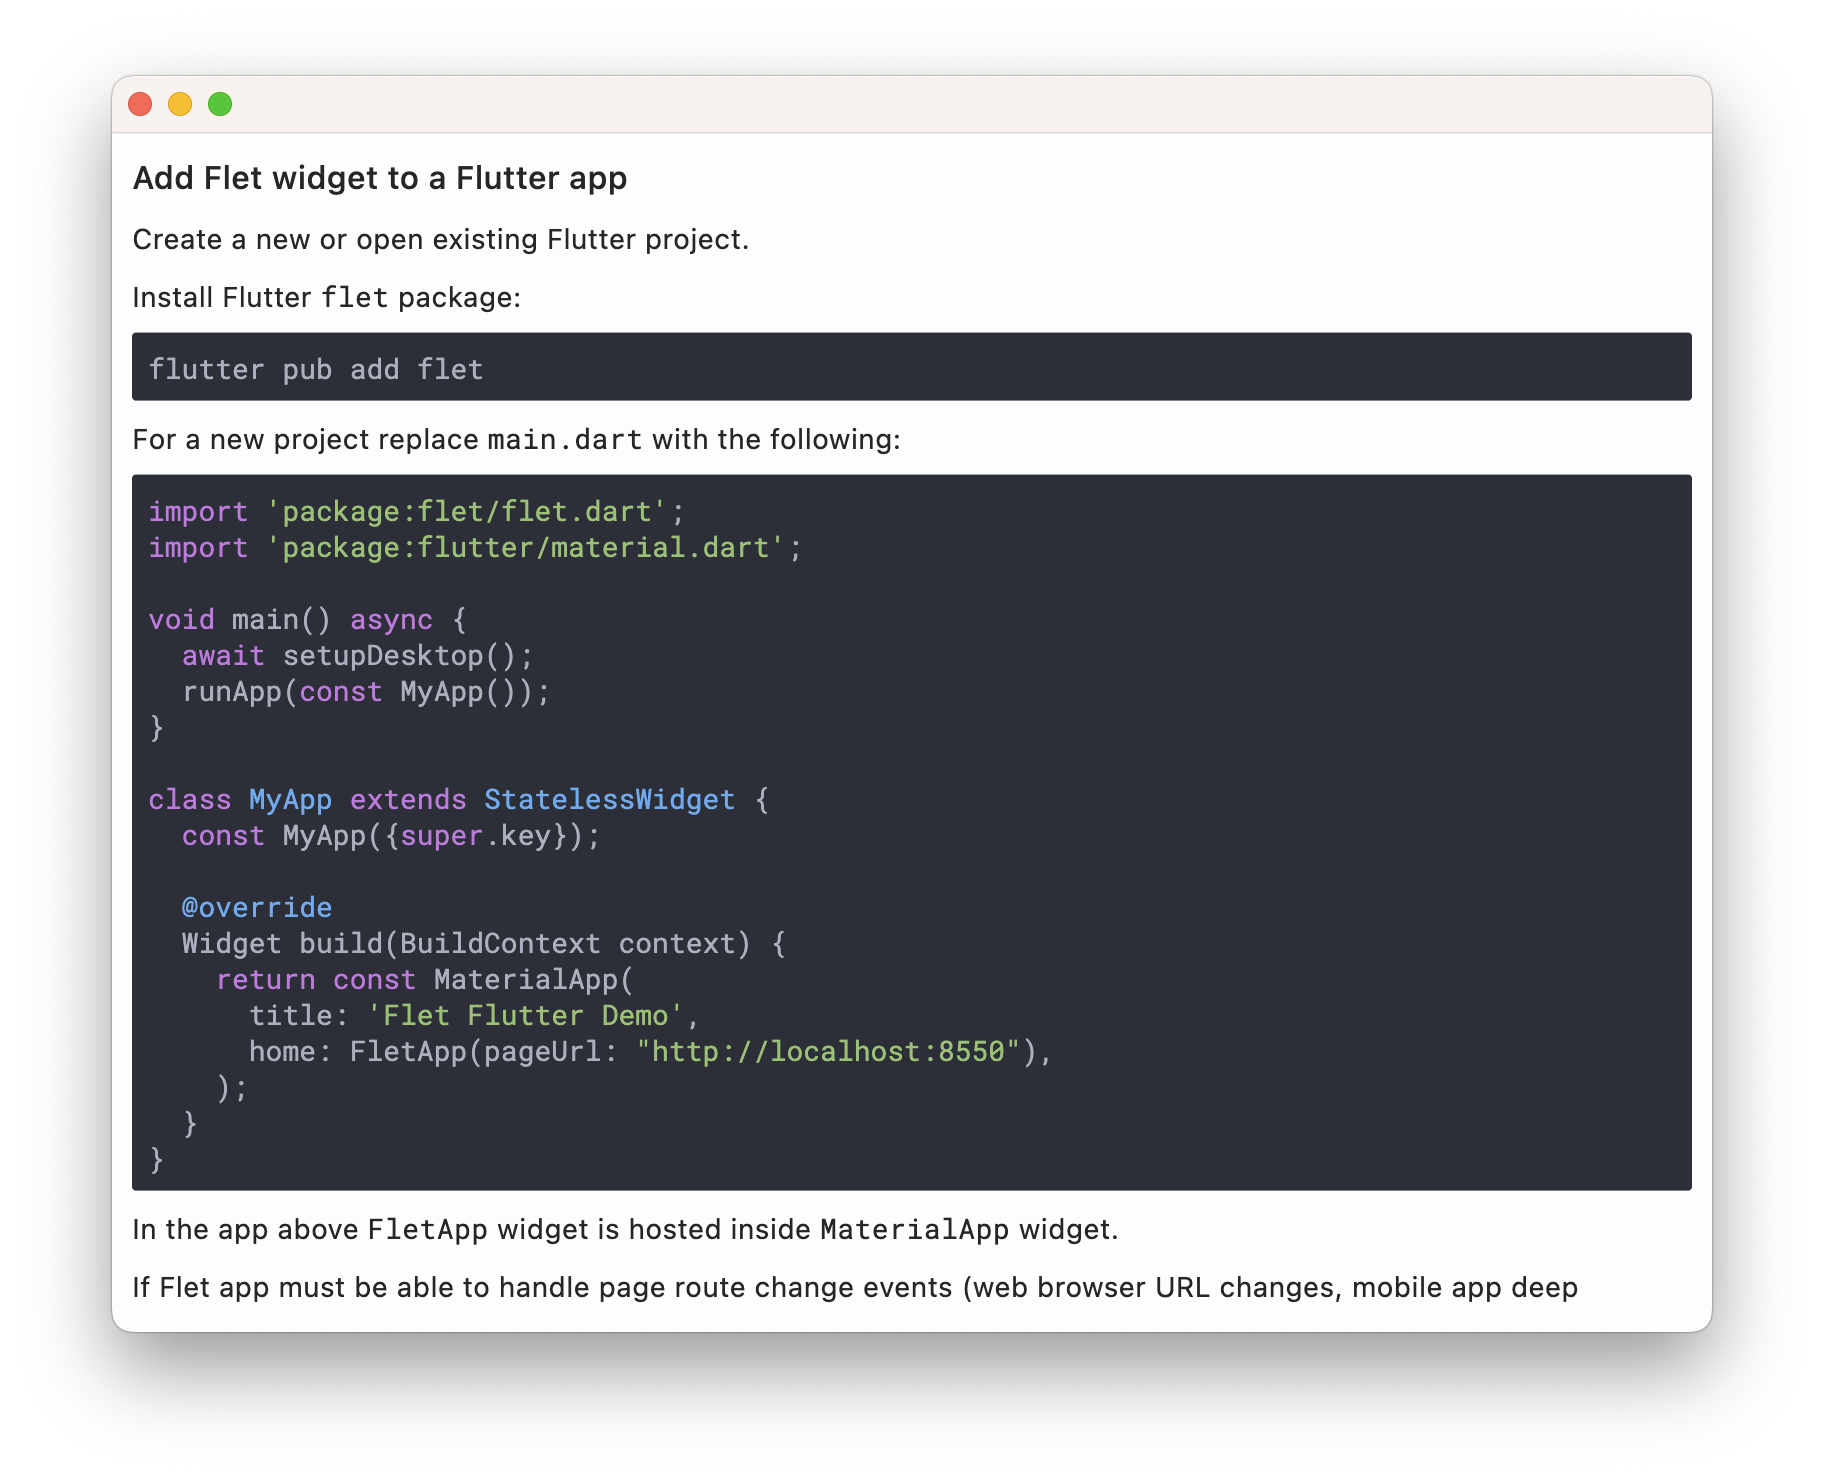
Sample code.

Variable fonts support

Flutter has finally supported variable fonts and we bring that into Flet too!

Sample code.

Upgrade Flet module to the latest version (pip install flet --upgrade) and let us know what you think!

Enjoy!
· 阅读需 2 分钟
Feodor Fitsner

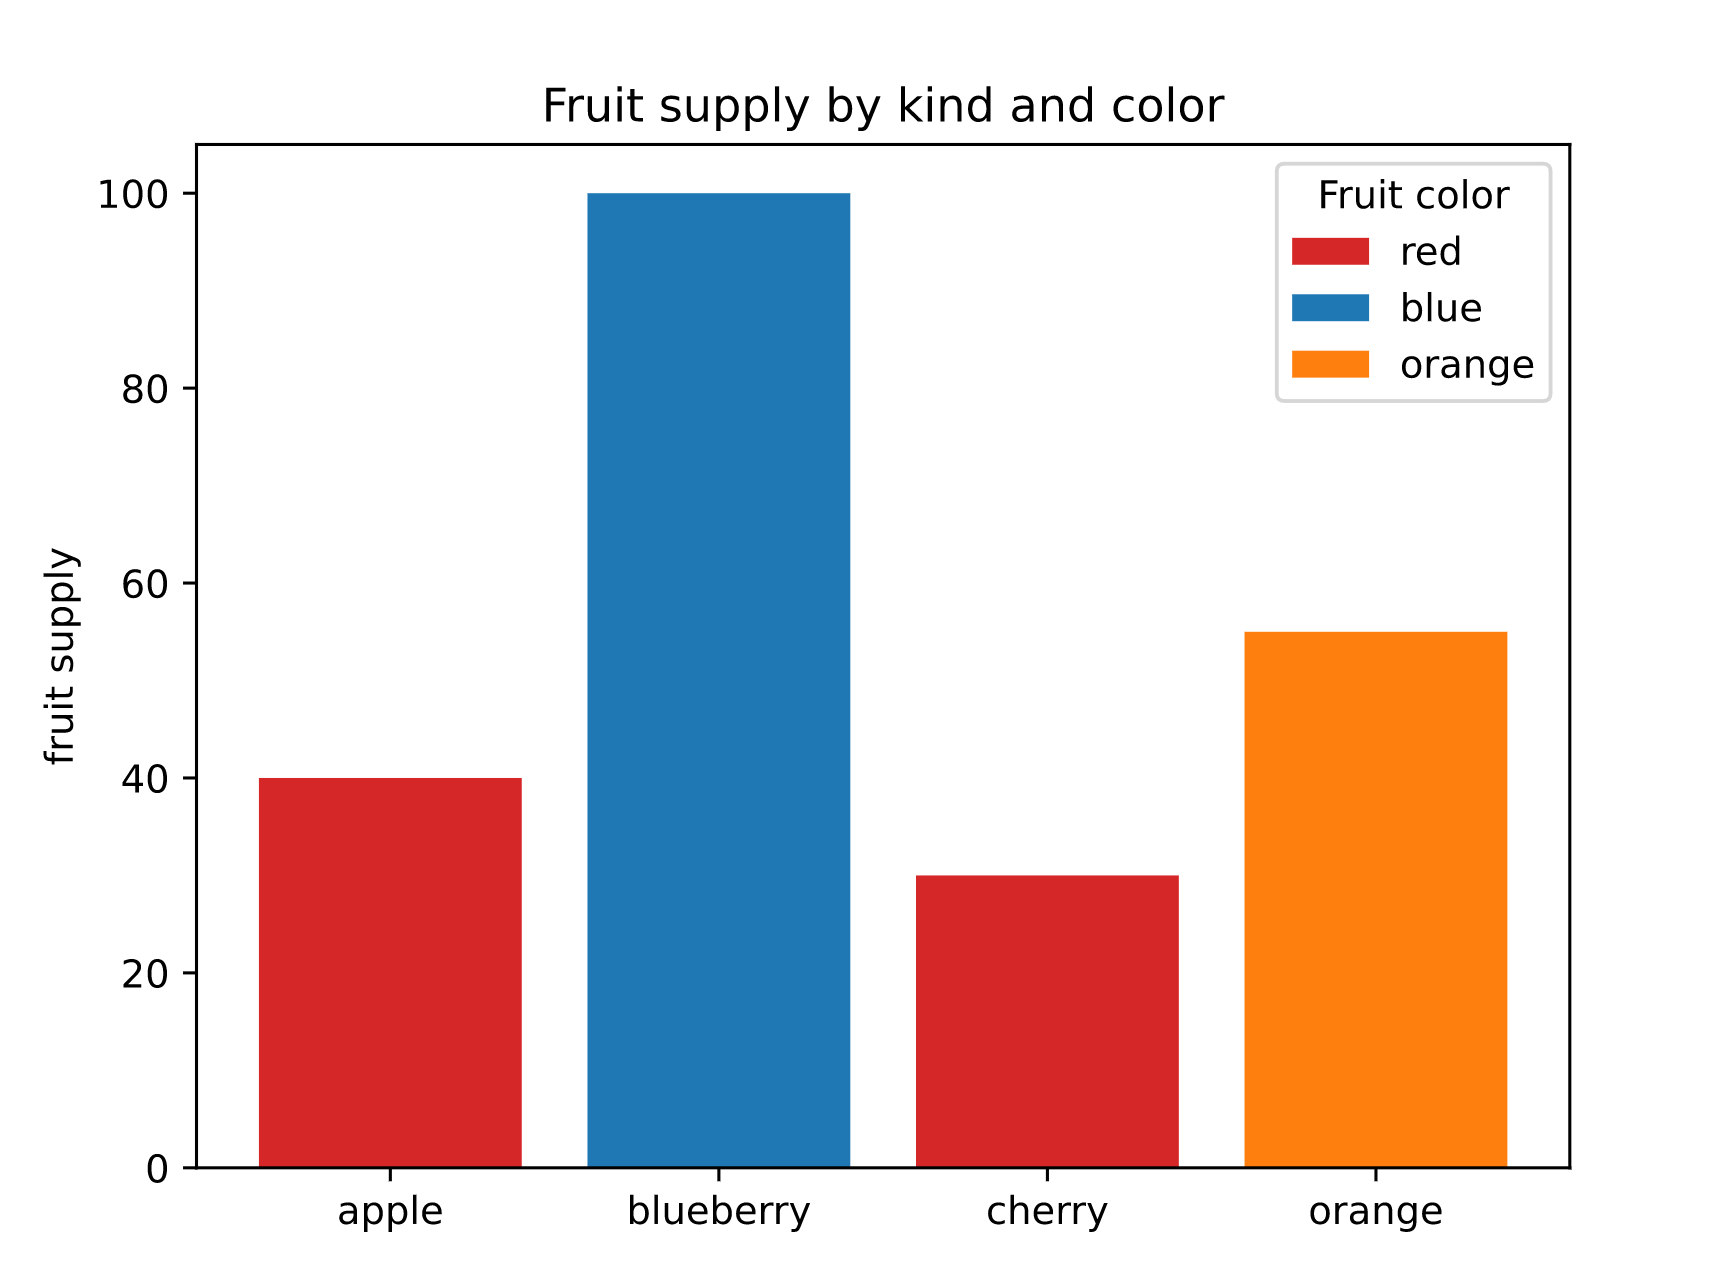
We are thrilled to introduce Matplotlib and Plotly charting controls in Flet 0.1.63!

Matplotlib and Plotly are the most recognized Python charting libraries with a ton of features. They are greatly compatible with other scientific Python libraries such as Numpy or Pandas.

No doubt, it would be nearly impossible to replicate their functionality as pure Flutter widgets. Fortunately, both Matplotlib and Plotly can export charts into various formats, such as SVG. On the other hand Flet can display SVG images and that gives a perfect combination - Flet charting controls for Matplotlib and Plotly!

The resulting solution works so great that it's possible to display almost any example from Matplotlib and Plotly galleries - your imagination is the only limit!

Plot a simple bar chart:

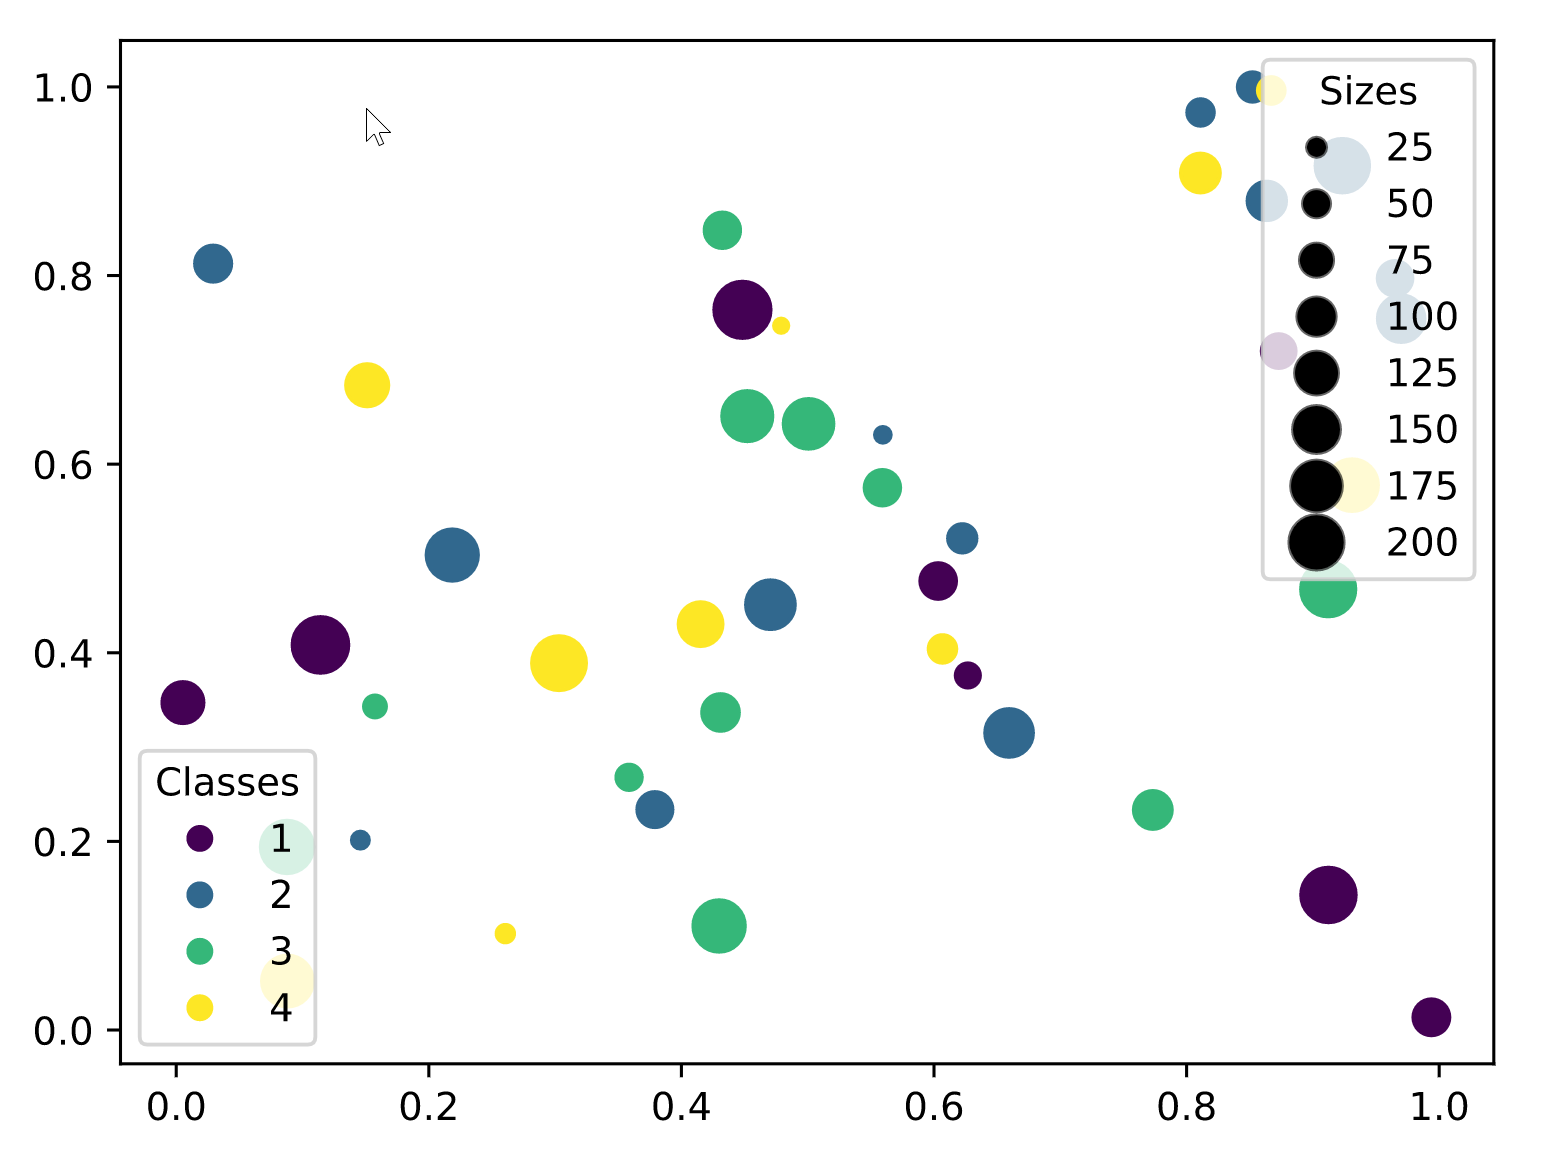
a nice scatter with legend:

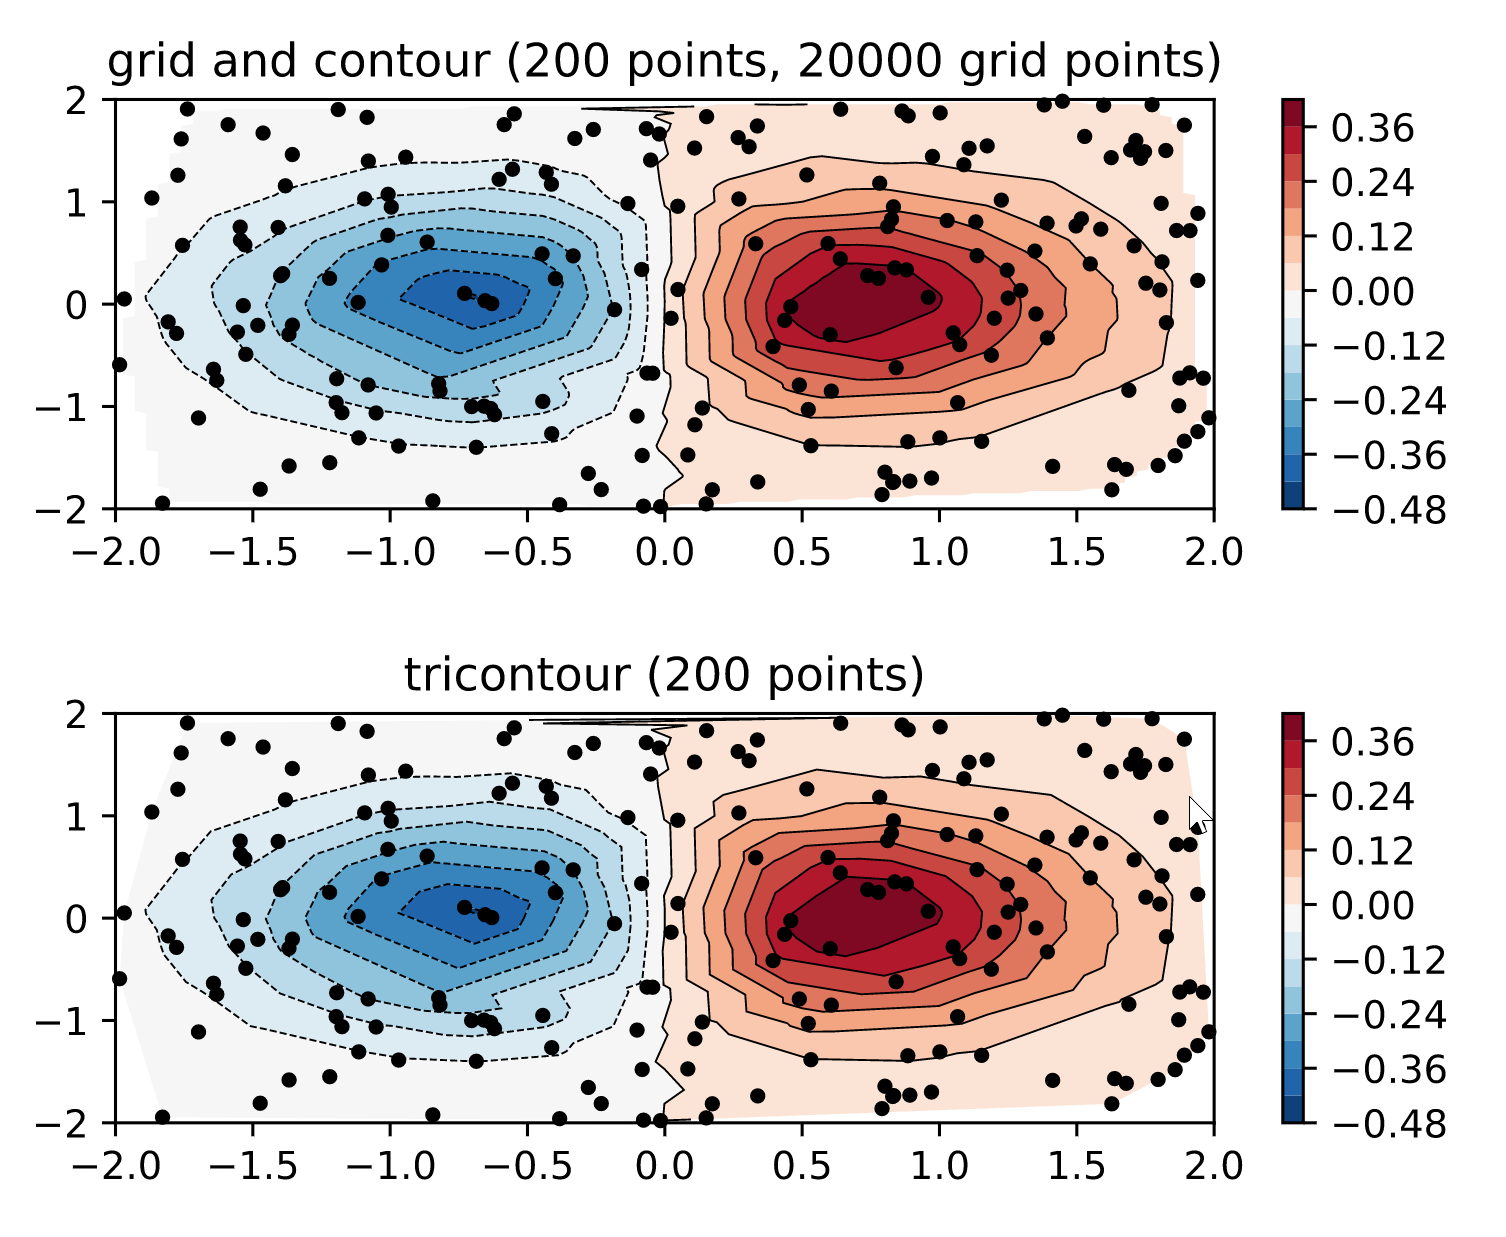
or some multi-chart contour plot:

Check the docs for Matplotlib and Plotly charting controls:

Explore Flet chart examples.

Learn Python libraries by examples:

In the future releases, we may add an interactive "toolbar" for Matplotlib charts by implementing a custom backend. Or maybe it's a great excersize for Flet users? 😉

Also, when it's time for Flet to support other languages we would need to re-visit charting to make it language-agnostic as the current charting implementation relies on Python libraries.

Upgrade Flet module to the latest version (pip install flet --upgrade), integrate auth in your app and let us know what you think!

Enjoy!
· 阅读需 2 分钟
Feodor Fitsner

We've just released Flet 0.1.62 with support of gestures processing!

There is a new control - GestureDetector which allows handling all sorts of gestures: single and double taps with a left (primary) and right (secondary) mouse (pointer) buttons, vertical, horizontal and bi-directional drags, zoom (pinch-in and pinch-out) gestures as well as hover events. Now, by wrapping it into GestureDetector, you can make any Flet control "clickable" and "draggable"!

Here is a simple example of an app which allows you to drag containers inside a Stack:

import flet as ft

def main(page: ft.Page):
def on_pan_update(e: ft.DragUpdateEvent):
e.control.top = max(0, e.control.top + e.delta_y)
e.control.left = max(0, e.control.left + e.delta_x)
e.control.update()

gd = ft.GestureDetector(
mouse_cursor=ft.MouseCursor.MOVE,
on_vertical_drag_update=on_pan_update,
left=100,
top=100,
content=ft.Container(bgcolor=ft.colors.BLUE, width=50, height=50, border_radius=5),
)

page.add( ft.Stack([gd], expand=True))

ft.app(target=main)

Gesture detector is yet another great addition to a collection of Flet primitives that allows you to build apps limited only by your imagination. 2D drawing coming later this month is going to complete that ensemble!

That release wasn't about only gestures though - that was a "stabilization" release too. We fixed a number of bugs and added a bunch of other small features which you can see here.

Upgrade Flet module to the latest version (pip install flet --upgrade), integrate auth in your app and let us know what you think!

Enjoy!
· 阅读需 3 分钟
Feodor Fitsner

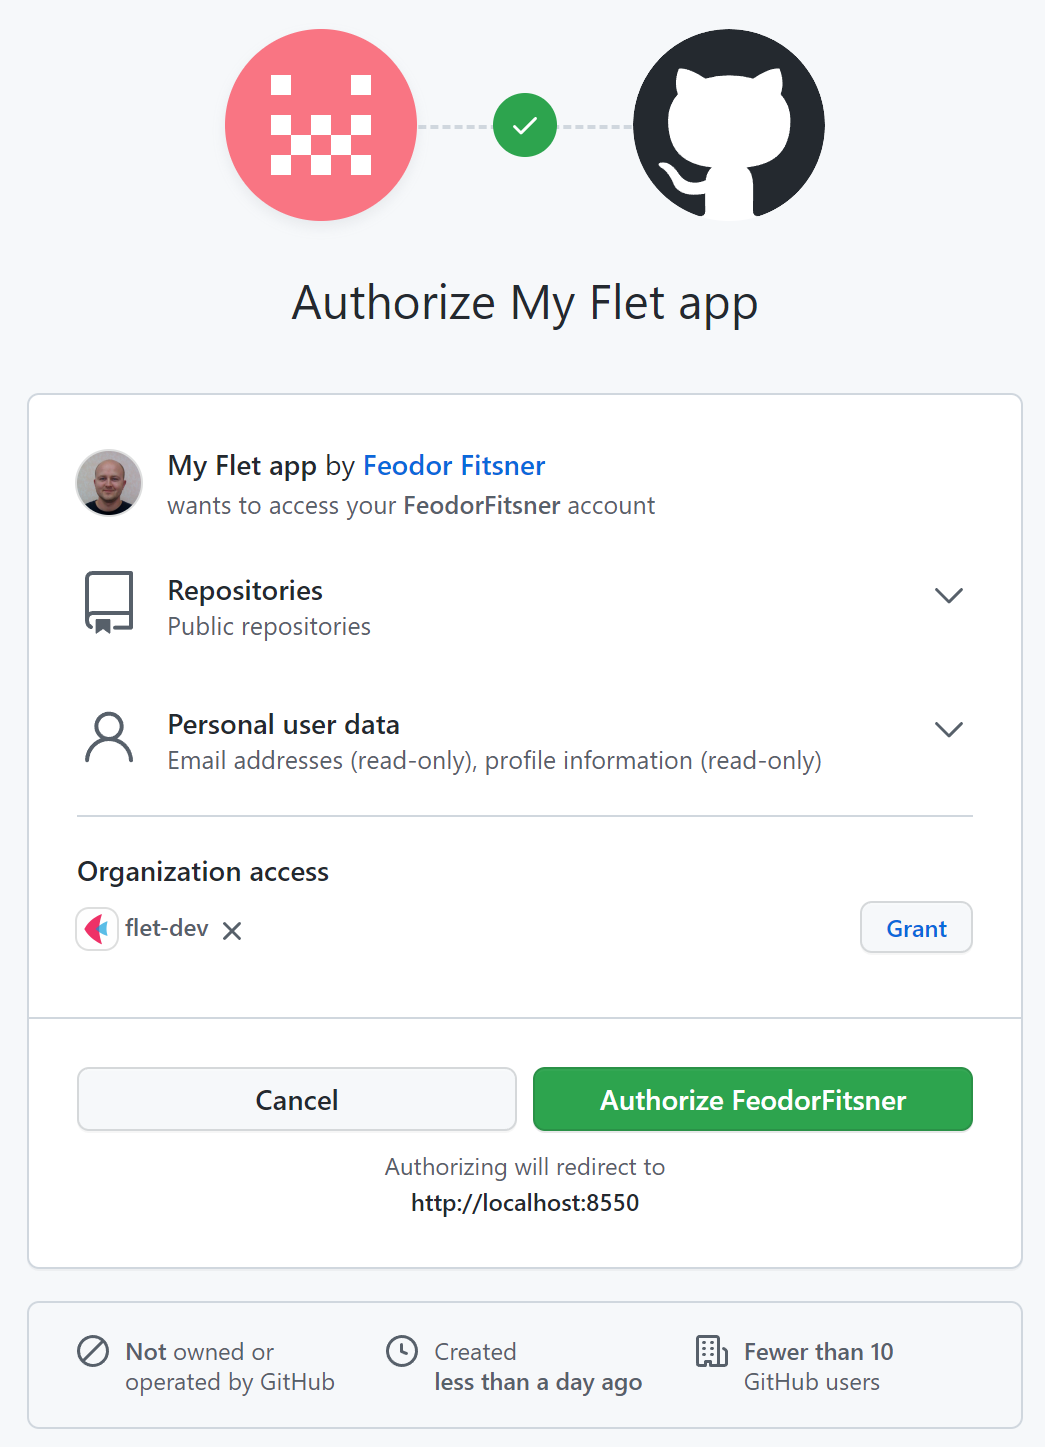
User authentication in Flet is here! 🎉

Now you can implement user authentication ("Login with X" buttons) in your Flet app using 3rd-party identity providers such as GitHub, Google, Azure, Auth0, LinkedIn and others:

Traditionally, this release is not just about authentication, but it adds a ton of accompanying functionality and small improvements:

Authentication

Flet authentication features:

  • Works with Flet desktop, web and mobile apps.
  • Using multiple authentication providers in one app.
  • Built-in OAuth providers with automatic user details fetching:
    • GitHub
    • Azure
    • Google
    • Auth0
  • Optional groups fetching.
  • Automatic token refresh.
  • Login with a saved token ("Remember me").
  • Custom OAuth providers.

A simple example on how to add "Login with GitHub" button to your Flet app:

import os

import flet as ft
from flet.auth.providers.github_oauth_provider import GitHubOAuthProvider

def main(page: ft.Page):

provider = GitHubOAuthProvider(
client_id=os.getenv("GITHUB_CLIENT_ID"),
client_secret=os.getenv("GITHUB_CLIENT_SECRET"),
redirect_url="http://localhost:8550/api/oauth/redirect",
)

def login_click(e):
page.login(provider)

def on_login(e):
print("Access token:", page.auth.token.access_token)
print("User ID:", page.auth.user.id)

page.on_login = on_login
page.add(ft.ElevatedButton("Login with GitHub", on_click=login_click))

ft.app(target=main, port=8550, view=ft.WEB_BROWSER)
备注

Before running the app set the secret environment variables in a command line:

$ export GITHUB_CLIENT_ID="<client_id>"
$ export GITHUB_CLIENT_SECRET="<client_secret>"

Read Authentication guide for more information and examples.

Client storage

Flet's client storage API that allows storing key-value data on a client side in a persistent storage. Flet implementation uses shared_preferences Flutter package.

Writing data to the storage:

page.client_storage.set("key", "value")

Reading data:

value = page.client_storage.get("key")

Read Client storage guide for more information and examples.

Session storage

Flet introduces an API for storing key-value data in user's session on a server side.

Writing data to the session:

page.session.set("key", "value")

Reading data:

value = page.session.get("key")

Read Session storage guide for more information and examples

Encryption API

In this release Flet introduces utility methods to encrypt and decrypt sensitive text data using symmetric algorithm (where the same key is used for encryption and decryption). It uses Fernet implementation from cryptography package, which is AES 128 with some additional hardening, plus PBKDF2 to derive encryption key from a user passphrase.

Encrypting data:

from flet.security import encrypt, decrypt
secret_key = "S3CreT!"
plain_text = "This is a secret message!"
encrypted_data = encrypt(plain_text, secret_key)

Decrypting data:

from flet.security import encrypt, decrypt
secret_key = "S3CreT!"
plain_text = decrypt(encrypted_data, secret_key)
print(plain_text)

Continue reading for more information and examples.

Other improvements

import flet as ft
def main(page: ft.Page):
page.window_bgcolor = ft.colors.TRANSPARENT
page.bgcolor=ft.colors.TRANSPARENT
page.window_title_bar_hidden = True
page.window_frameless = True
page.window_left = 400
page.window_top = 400
page.add(ft.ElevatedButton("I'm a floating button!"))
ft.app(target=main)

Upgrade Flet module to the latest version (pip install flet --upgrade), integrate auth in your app and let us know what you think!

Enjoy!

· 阅读需 4 分钟
Feodor Fitsner

Finally, File picker with uploads has arrived! 🎉

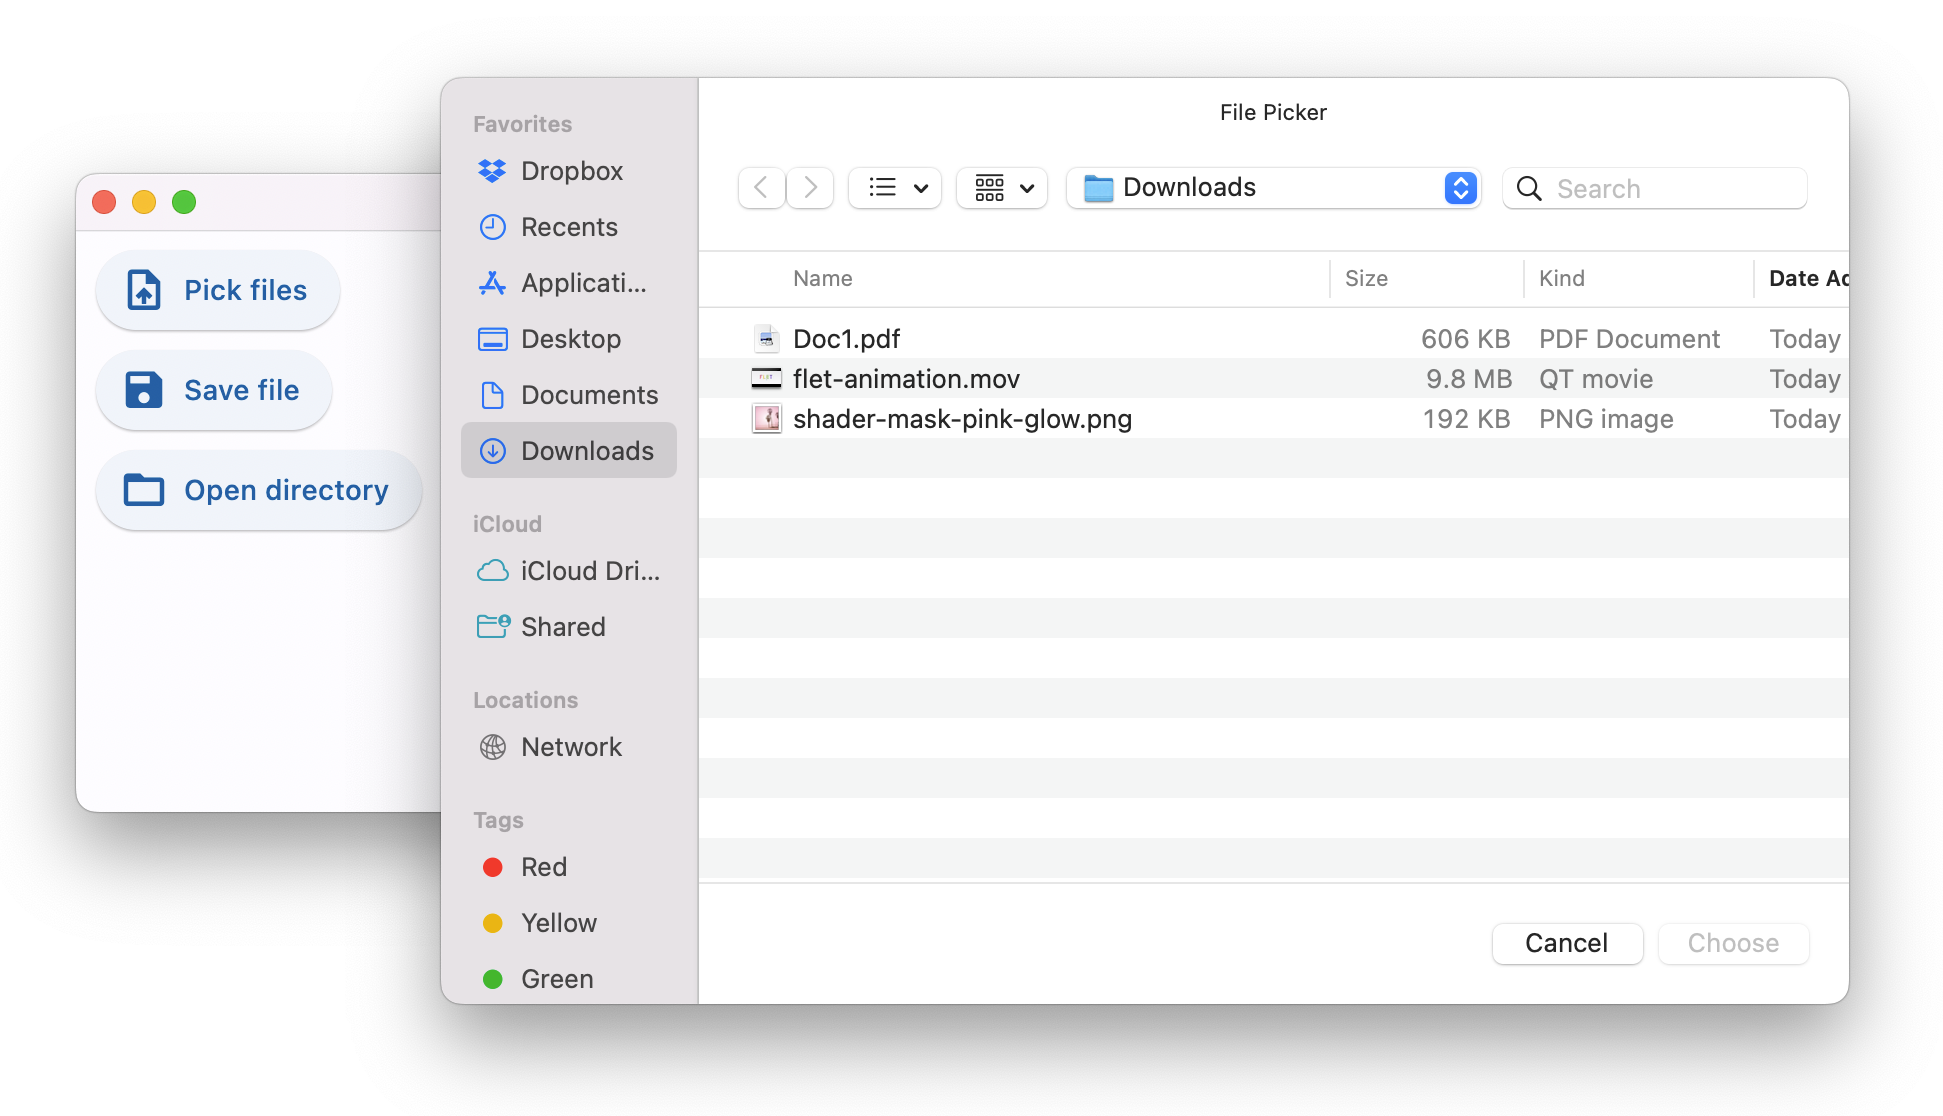
File picker control opens a native OS dialog for selecting files and directories. It's based on a fantastic file_picker Flutter package.

It works on all platforms: Web, macOS, Window, Linux, iOS and Android.

Check out source code of the demo above.

File picker allows opening three dialogs:

  • Pick files - one or multiple, any files or only specific types.
  • Save file - choose directory and file name.
  • Get directory - select directory.

When running Flet app in a browser only "Pick files" option is available and it's used for uploads only as it, obviously, doesn't return a full path to a selected file.

Where file picker really shines is a desktop! All three dialogs return full paths to selected files and directories - great assistance to your users!

Using file picker in your app

It is recommended to add file picker to page.overlay.controls collection, so it doesn't affect the layout of your app. Despite file picker has 0x0 size it is still considered as a control when put into Row or Column.

import flet as ft

file_picker = ft.FilePicker()
page.overlay.append(file_picker)
page.update()

To open file picker dialog call one of the three methods:

  • pick_files()
  • save_file()
  • get_directory_path()

Lambda works pretty nice for that:

ft.ElevatedButton("Choose files...",
on_click=lambda _: file_picker.pick_files(allow_multiple=True))

When dialog is closed FilePicker.on_result event handler is called which event object has one of the following properties set:

  • files - "Pick files" dialog only, a list of selected files or None if dialog was cancelled.
  • path - "Save file" and "Get directory" dialogs, a full path to a file or directory or None if dialog was cancelled.
import flet as ft

def on_dialog_result(e: ft.FilePickerResultEvent):
print("Selected files:", e.files)
print("Selected file or directory:", e.path)

file_picker = ft.FilePicker(on_result=on_dialog_result)

The last result is always available in FilePicker.result property.

Check File picker control docs for all available dialog methods and their parameters.

Uploading files

File picker has built-in upload capabilities that work on all platforms and the web.

To upload one or more files you should call FilePicker.pick_files() first. When the files are selected by the user they are not automatically uploaded anywhere, but instead their references are kept in the file picker state.

To perform an actual upload you should call FilePicker.upload() method and pass the list of files that need to be uploaded along with their upload URLs and upload method (PUT or POST):

import flet as ft

def upload_files(e):
upload_list = []
if file_picker.result != None and file_picker.result.files != None:
for f in file_picker.result.files:
upload_list.append(
FilePickerUploadFile(
f.name,
upload_url=page.get_upload_url(f.name, 600),
)
)
file_picker.upload(upload_list)

ft.ElevatedButton("Upload", on_click=upload_files)
备注

If you need to separate uploads for each user you can specify a filename prepended with any number of directories in page.get_upload_url() call, for example:

upload_url = page.get_upload_url(f"/{username}/pictures/{f.name}", 600)

/{username}/pictures directories will be automatically created inside upload_dir if not exist.

Upload storage

Notice the usage of page.get_upload_url() method - it generates a presigned upload URL for Flet's internal upload storage.

Use any storage for file uploads

You can generate presigned upload URL for AWS S3 storage using boto3 library.

The same technique should work for Wasabi, Backblaze, MinIO and any other storage providers with S3-compatible API.

To enable Flet saving uploaded files to a directory provide full or relative path to that directory in flet.app() call:

ft.app(target=main, upload_dir="uploads")

You can even put uploads inside "assets" directory, so uploaded files, e.g. pictures, docs or other media, can be accessed from a Flet client right away:

ft.app(target=main, assets_dir="assets", upload_dir="assets/uploads")

and somewhere in your app you can display uploaded picture with:

page.add(ft.Image(src="/uploads/<some-uploaded-picture.png>"))

Upload progress

Once FilePicker.upload() method is called Flet client asynchronously starts uploading selected files one-by-one and reports the progress via FilePicker.on_upload callback.

Event object of on_upload event is an instance of FilePickerUploadEvent class with the following fields:

  • file_name
  • progress - a value from 0.0 to 1.0.
  • error

The callback is called at least twice for every uploaded file: with 0 progress before upload begins and with 1.0 progress when upload is finished. For files larger than 1 MB a progress is additionally reported for every 10% uploaded.

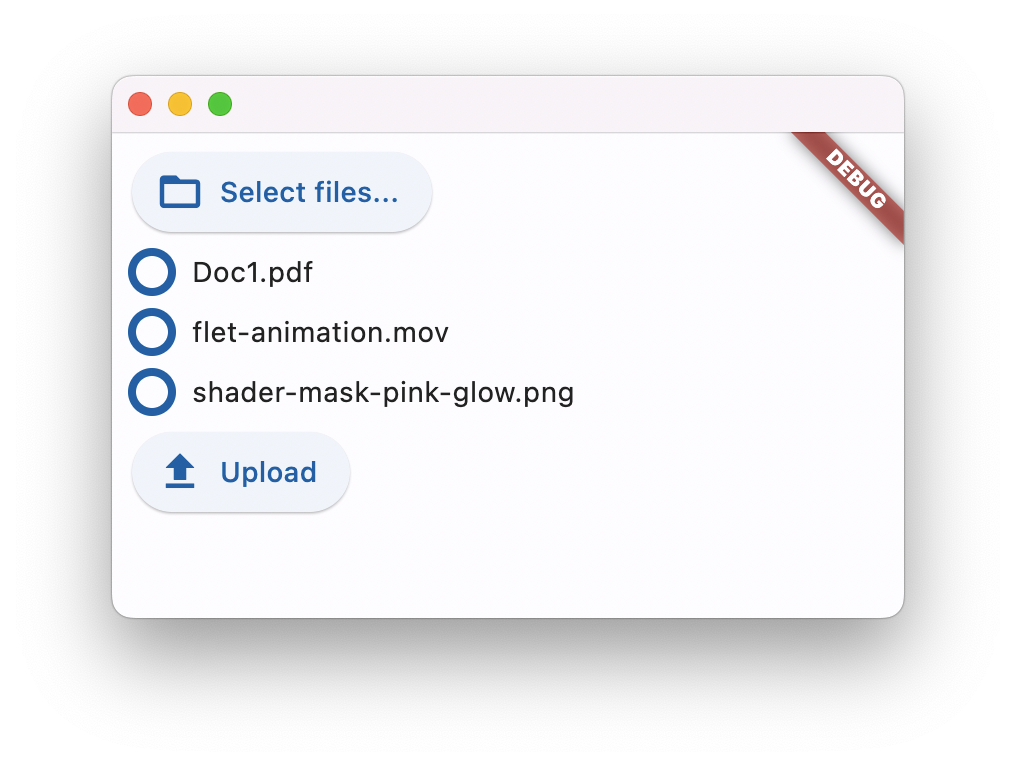
Check that example demonstrating multiple file uploads:

See File picker control docs for all its properties and examples.

Upgrade Flet module to the latest version (pip install flet --upgrade), give File Picker a try and let us know what you think!

Enjoy!
· 阅读需 2 分钟
Feodor Fitsner

Despite Flet release debuting animations support was released some time ago, we've just finished documenting its new features! We all know if the feature is not documented it just doesn't exist! 😉

Flutter offers multiple approaches for creating animations such "implicit", "explicit", "tween", "stagered", "pre-canned" animations as well as displaying animation scenes prepared in Rive and Lottie editors.

We are starting with "implicit" animations which allows you to animate a control property by setting a target value; whenever that target value changes, the control animates the property from the old value to the new one.

Demo time

Explore demo sources. The demo is hosted on Heroku, by the way, so you can use it as a starting point for your own deployments.

Implicit animations

Implicit animations can be enabled for the following control properties:

Additionally, all Container control properties can be now animated and there is a new AnimatedSwitcher control for animated transition between old a new content.

Other new features

Markdown control

Allows to render text in Markdown format. Supports various extensions: CommonMark, GitHub Web and GitHub Flavored.

See Markdown control docs for more information and examples.

URL launcher

page.launch_url(url) method allows programmatically opening a URL in a new browser window, for example:

page.launch_url("https://google.com")

It also works nice with Markdown control for opening links within markdown document.

Keyboard shortcuts

Page now contains on_keyboard_event event handlet to globally intercept all keystrokes.

Check this simple usage example.

Accessibility improvements

We added Accessibility section to the docs covering semantics support for screen readers.

ShaderMark control

A control that applies a mask generated by a shader to its content. Allows making nice effects like gradually fading out images.

That's it!

Give Flet a try and let us know what you think!

· 阅读需 4 分钟
Feodor Fitsner

We've just released Flet 0.1.46 adding new exciting features:

  • Gradient backgrounds in Container
  • Extensive styling for buttons, TextField and Dropdown controls
  • ...and more

Gradient backgrounds

Linear gradient

import math
import flet as ft

def main(page: ft.Page):

page.add(
ft.Container(
alignment=ft.alignment.center,
gradient=ft.LinearGradient(
begin=ft.alignment.top_left,
end=Alignment(0.8, 1),
colors=[
"0xff1f005c",
"0xff5b0060",
"0xff870160",
"0xffac255e",
"0xffca485c",
"0xffe16b5c",
"0xfff39060",
"0xffffb56b",
],
tile_mode=ft.GradientTileMode.MIRROR,
rotation=math.pi / 3,
),
width=150,
height=150,
border_radius=5,
)
)

ft.app(target=main)

Check Container.gradient docs for more information about LinearGradient properties.

Radial gradient

import flet as ft

def main(page: ft.Page):

page.add(
ft.Container(
alignment=ft.alignment.center,
gradient=ft.RadialGradient(
center=Alignment(0.7, -0.6),
radius=0.2,
colors=[
"0xFFFFFF00", # yellow sun
"0xFF0099FF", # blue sky
],
stops=[0.4, 1.0],
),
width=150,
height=150,
border_radius=5,
)
)

ft.app(target=main)

Check Container.gradient docs for more information about RadialGradient properties.

Sweep gradient

import math
import flet as ft

def main(page: ft.Page):

page.add(
ft.Container(
alignment=ft.alignment.center,
gradient=SweepGradient(
center=ft.alignment.center,
start_angle=0.0,
end_angle=math.pi * 2,
colors=[
"0xFF4285F4",
"0xFF34A853",
"0xFFFBBC05",
"0xFFEA4335",
"0xFF4285F4",
],
stops=[0.0, 0.25, 0.5, 0.75, 1.0],
),
width=150,
height=150,
border_radius=5,
)
)

ft.app(target=main)

Check Container.gradient docs for more information about SweepGradient properties.

Buttons styling

This Flet release introduces style property to all button controls which is an instance of ButtonStyle class. ButtonStyle allows controling all visual aspects of a button, such as shape, foreground, background and shadow colors, content padding, border width and radius!

Moreover, each individual style attribute could be configured for a different "Material states" of a button, such as "hovered", "focused", "disabled" and others. For example, you can configure a different shape, background color for a hovered state and configure fallback values for all other states.

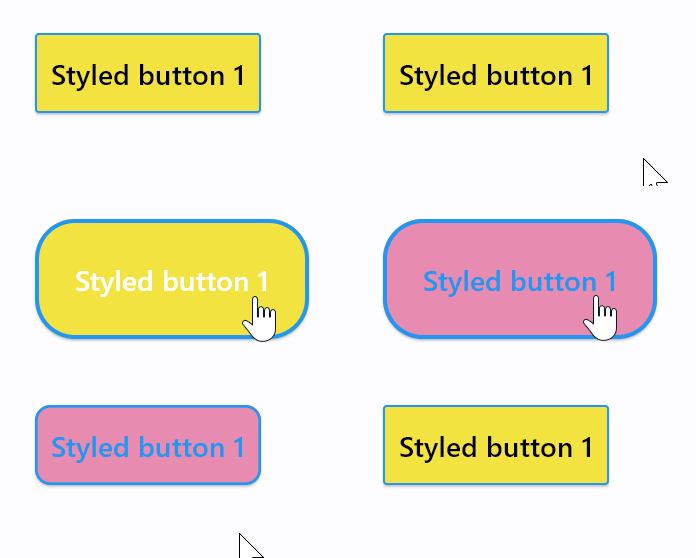
Check this "extreme" styling example:

import flet as ft
from flet.border import BorderSide
from flet.buttons import RoundedRectangleBorder

def main(page: ft.Page):

page.add(
ft.ElevatedButton(
"Styled button 1",
style=ft.ButtonStyle(
color={
ft.MaterialState.HOVERED: ft.colors.WHITE,
ft.MaterialState.FOCUSED: ft.colors.BLUE,
ft.MaterialState.DEFAULT: ft.colors.BLACK,
},
bgcolor={ft.MaterialState.FOCUSED: ft.colors.PINK_200, "": ft.colors.YELLOW},
padding={ft.MaterialState.HOVERED: 20},
overlay_color=ft.colors.TRANSPARENT,
elevation={"pressed": 0, "": 1},
animation_duration=500,
side={
ft.MaterialState.DEFAULT: BorderSide(1, ft.colors.BLUE),
ft.MaterialState.HOVERED: BorderSide(2, ft.colors.BLUE),
},
shape={
ft.MaterialState.HOVERED: RoundedRectangleBorder(radius=20),
ft.MaterialState.DEFAULT: RoundedRectangleBorder(radius=2),
},
),
)
)

ft.app(target=main)

ft.MaterialState.DEFAULT state is a fallback style.

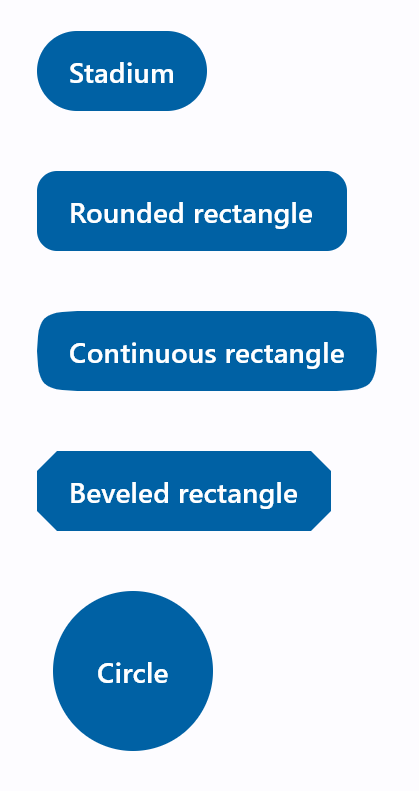
Button shape could also be changed with ButtonStyle.shape property:

import flet as ft
from flet.buttons import (
BeveledRectangleBorder,
CircleBorder,
CountinuosRectangleBorder,
RoundedRectangleBorder,
StadiumBorder,
)

def main(page: ft.Page):
page.padding = 30
page.spacing = 30
page.add(
ft.FilledButton(
"Stadium",
style=ft.ButtonStyle(
shape=ft.StadiumBorder(),
),
),
ft.FilledButton(
"Rounded rectangle",
style=ft.ButtonStyle(
shape=ft.RoundedRectangleBorder(radius=10),
),
),
ft.FilledButton(
"Continuous rectangle",
style=ft.ButtonStyle(
shape=ft.CountinuosRectangleBorder(radius=30),
),
),
ft.FilledButton(
"Beveled rectangle",
style=ft.ButtonStyle(
shape=ft.BeveledRectangleBorder(radius=10),
),
),
ft.FilledButton(
"Circle",
style=ft.ButtonStyle(shape=ft.CircleBorder(), padding=30),
),
)

ft.app(target=main)

Check ElevatedButton.style property docs for a complete description of ButtonStyle class and its properties.

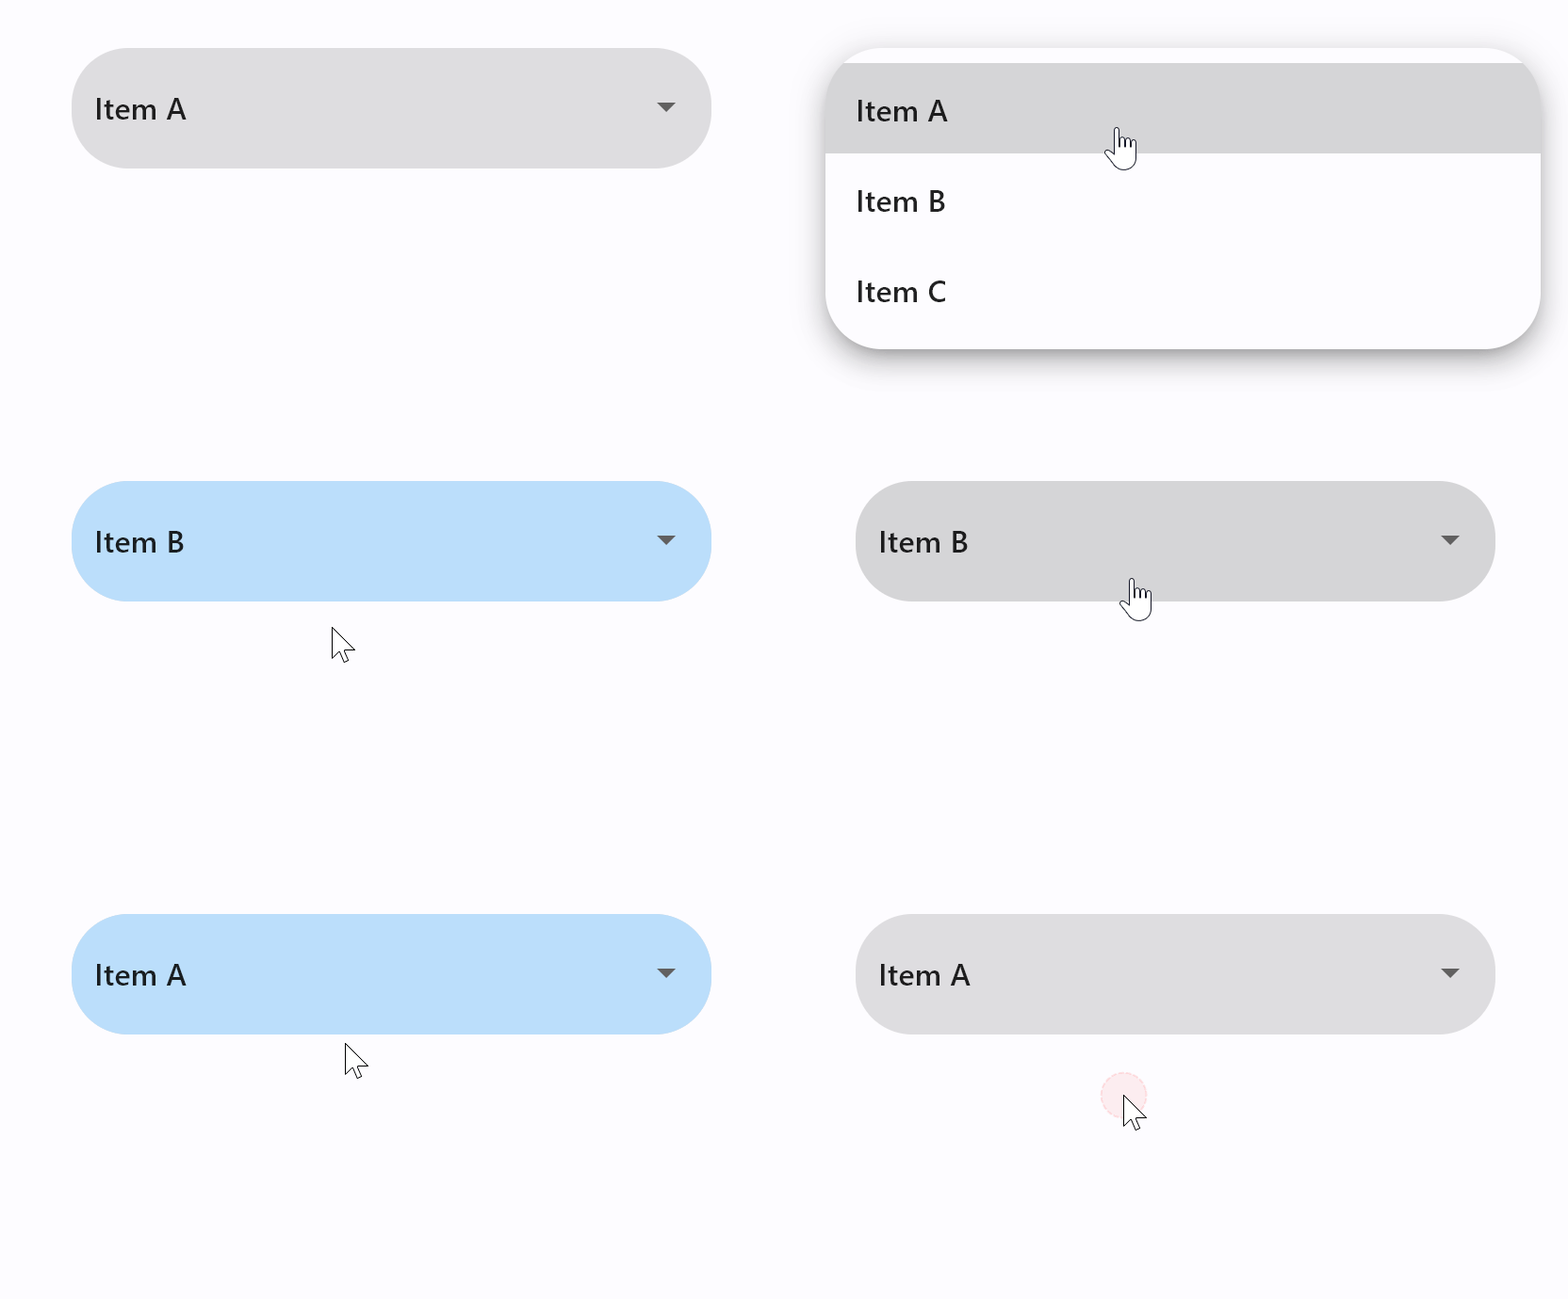
TextField and Dropdown styling

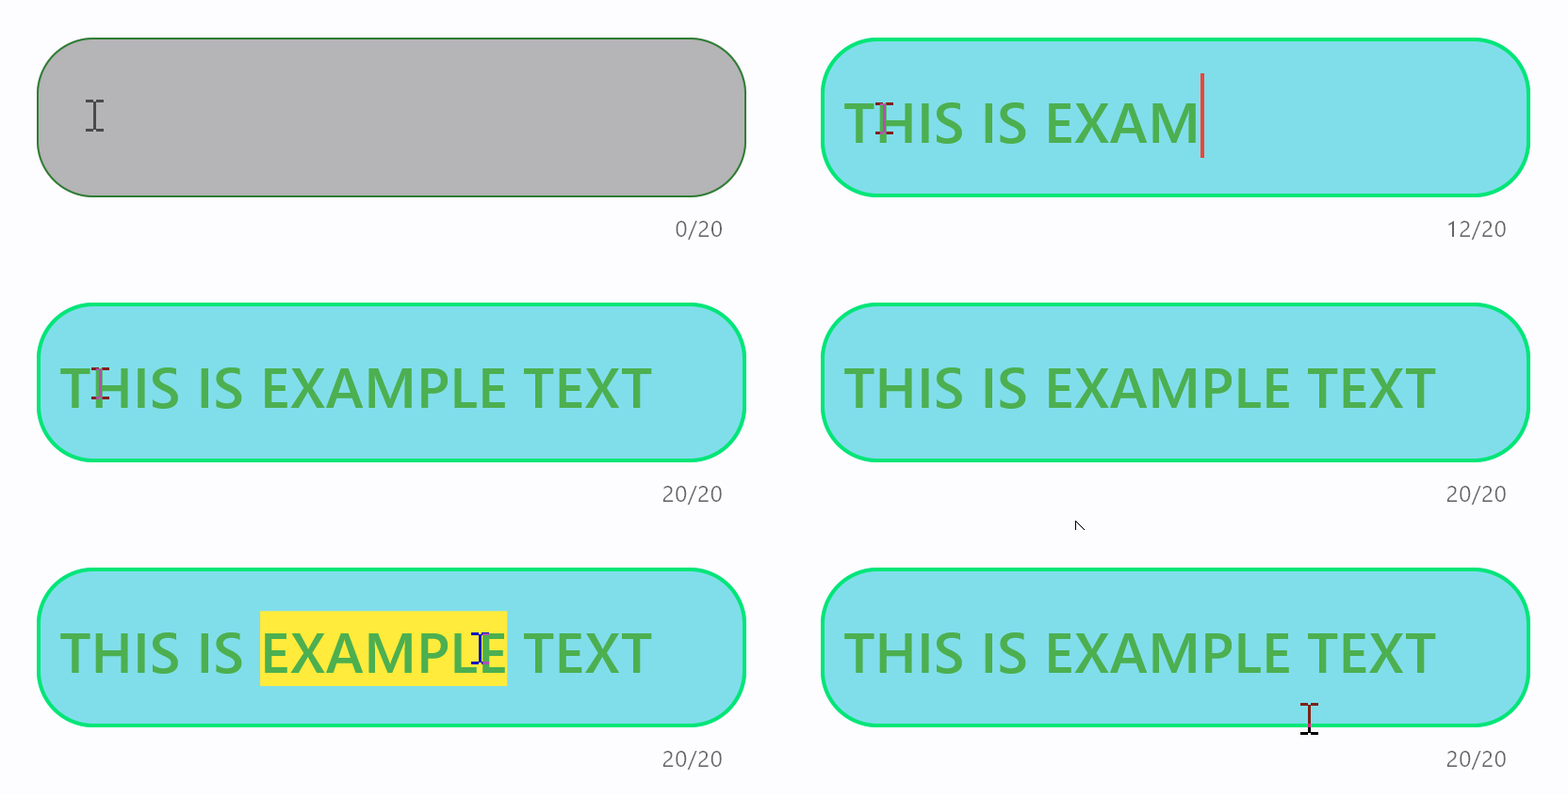
It is now possible to configure text size, border style and corners radius for normal and focused states of TextField and Dropdown controls. TextField also allows configuring colors for a cursor and selection.

Additionally, the maximum length of entered into TextField can now be limited with max_length property.

We also introduced capitalization property for automatic capitalization of characters as you type them into TextField. You can choose from 4 capitalization strategies: none (default), characters, words and sentences.

An example of styled TextField with max_length and capitalization:

import flet as ft

def main(page: ft.Page):
page.padding = 50
page.add(
ft.TextField(
text_size=30,
cursor_color=ft.colors.RED,
selection_color=ft.colors.YELLOW,
color=ft.colors.PINK,
bgcolor=ft.colors.BLACK26,
filled=True,
focused_color=ft.colors.GREEN,
focused_bgcolor=ft.colors.CYAN_200,
border_radius=30,
border_color=ft.colors.GREEN_800,
focused_border_color=ft.colors.GREEN_ACCENT_400,
max_length=20,
capitalization="characters",
)
)

ft.app(target=main)

An example of styled Dropdown control:

import flet as ft

def main(page: ft.Page):
page.padding = 50
page.add(
ft.Dropdown(
options=[
ft.dropdown.Option("a", "Item A"),
ft.dropdown.Option("b", "Item B"),
ft.dropdown.Option("c", "Item C"),
],
border_radius=30,
filled=True,
border_color=ft.colors.TRANSPARENT,
bgcolor=ft.colors.BLACK12,
focused_bgcolor=ft.colors.BLUE_100,
)
)

ft.app(target=main)

Other changes

IconButton got selected state which plays nice with a new style.

This is an example of a toggle icon button:

import flet as ft

def main(page: ft.Page):

def toggle_icon_button(e):
e.control.selected = not e.control.selected
e.control.update()

page.add(
ft.IconButton(
icon=ft.icons.BATTERY_1_BAR,
selected_icon=ft.icons.BATTERY_FULL,
on_click=toggle_icon_button,
selected=False,
style=ft.ButtonStyle(color={"selected": ft.colors.GREEN, "": ft.colors.RED}),
)
)

ft.app(target=main)

Give Flet a try and let us know what you think!

· 阅读需 5 分钟
Feodor Fitsner

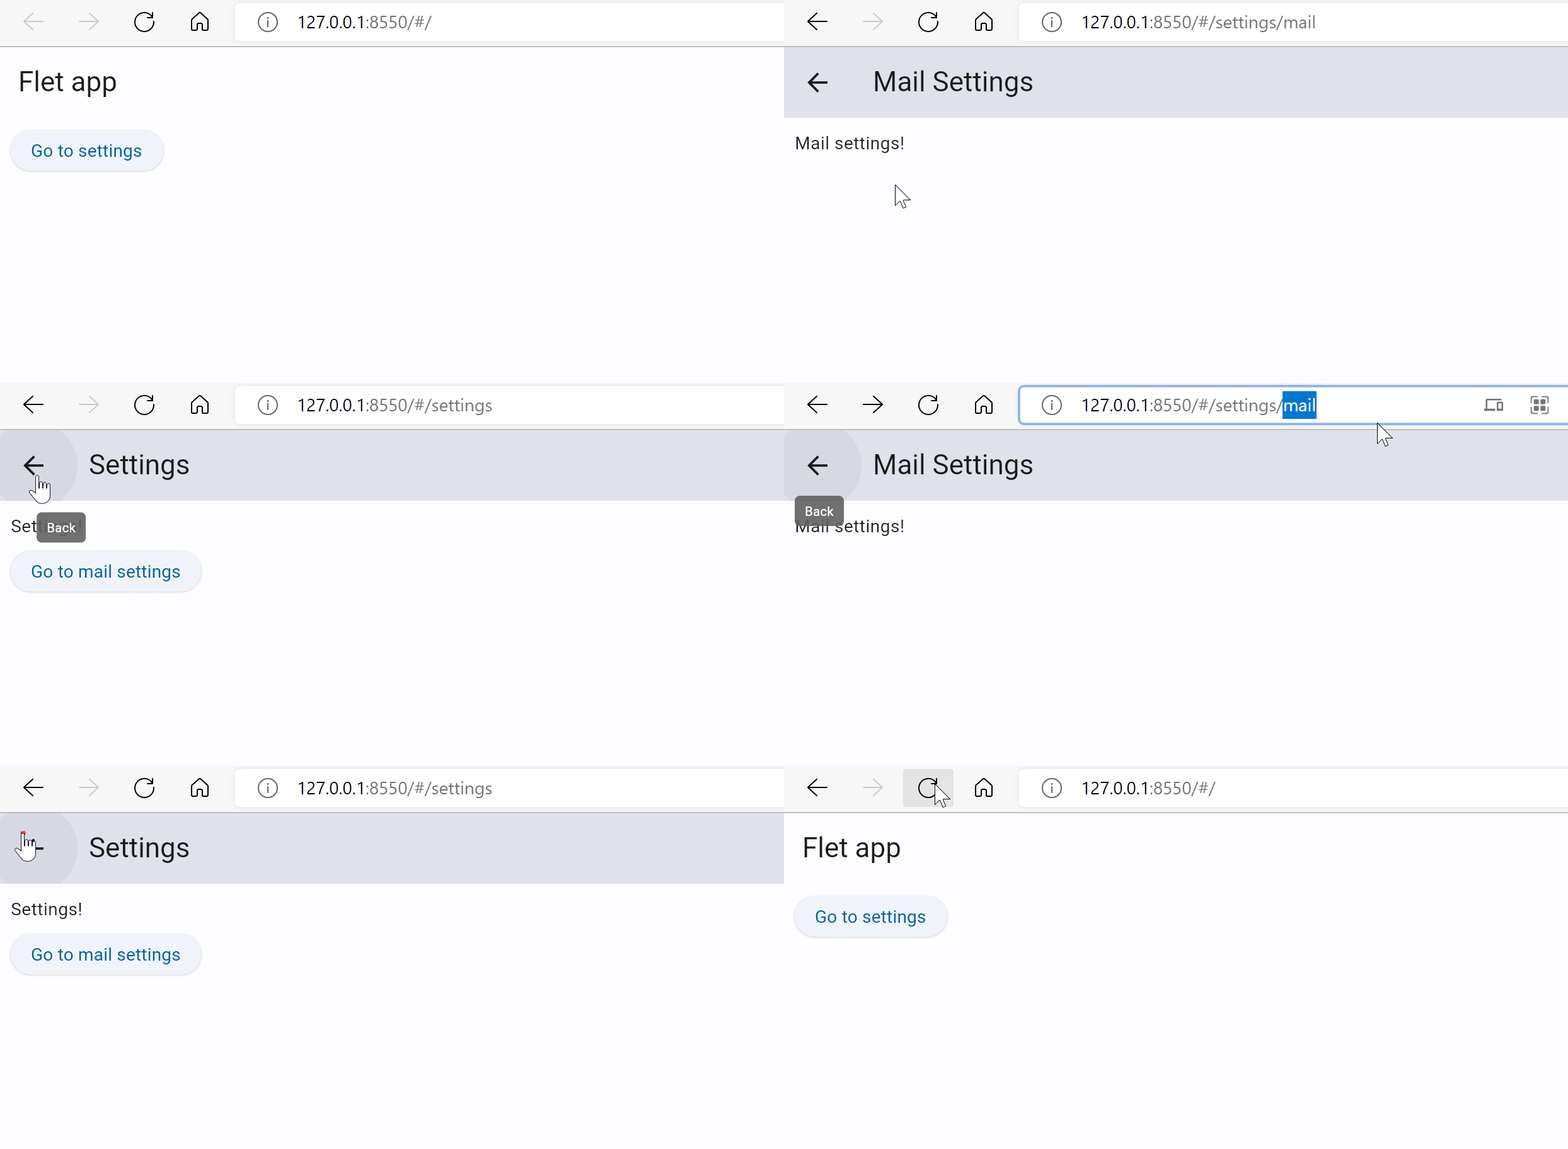
Flet 0.1.42 has been released with navigation and routing!

Navigation and routing is an essential feature of Single Page Applications (SPA) which allows organizing application user interface into virtual pages (views) and "navigate" between them while application URL reflects the current state of the app.

For mobile apps navigation and routing serves as a deep linking to specific application parts.

Well, it took more efforts than expected to add navigation and routing into Flet as the implementation is based on Navigator 2.0 Flutter API and required to replace Flet's "Page" abstraction with "Page and Views". Flutter's newer navigation and routing API has substantial improvements such as:

  1. Programmatic control over history stack.
  2. An easy way to intercept a call to "Back" button in AppBar.
  3. Robust synchronization with browser history.

Explore source code of the example above.

Page route

Page route is a portion of application URL after # symbol:

Default application route, if not set in application URL by the user, is /. All routes start with /, for example /store, /authors/1/books/2.

Application route can be obtained by reading page.route property, for example:

import flet as ft

def main(page: ft.Page):
page.add(ft.Text(f"Initial route: {page.route}"))

ft.app(target=main, view=ft.WEB_BROWSER)

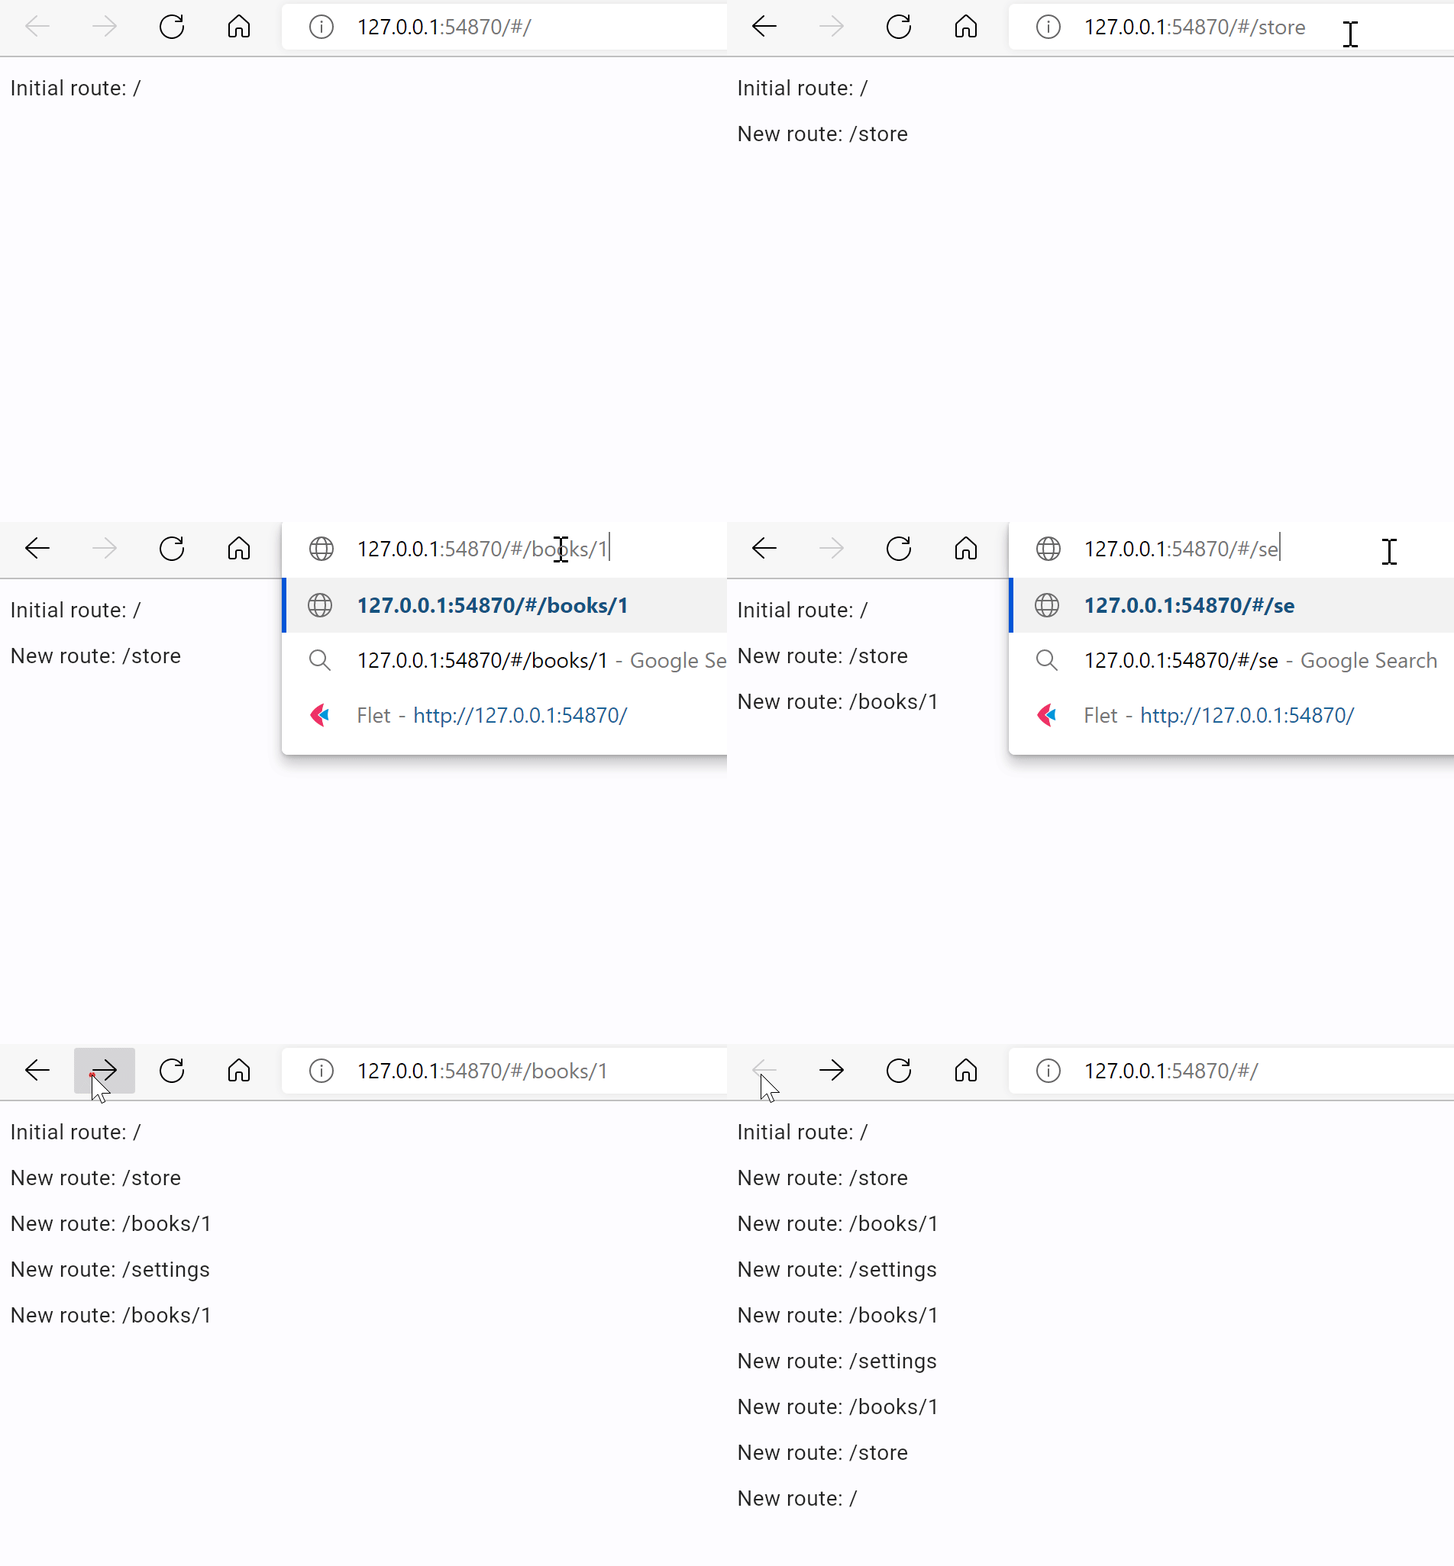
Grab application URL, open a new browser tab, paste the URL, modify its part after # to /test and hit enter. You should see "Initial route: /test".

Every time the route in the URL is changed (by editing the URL or navigating browser history with Back/Forward buttons) Flet calls page.on_route_change event handler:

import flet as ft

def main(page: ft.Page):
page.add(ft.Text(f"Initial route: {page.route}"))

def route_change(route):
page.add(ft.Text(f"New route: {route}"))

page.on_route_change = route_change
page.update()

ft.app(target=main, view=ft.WEB_BROWSER)

Now try updating URL hash a few times and then use Back/Forward buttons! You should see a new message added to a page each time the route changes:

Route can be changed programmatically, by updating page.route property:

import flet as ft

def main(page: ft.Page):
page.add(ft.Text(f"Initial route: {page.route}"))

def route_change(route):
page.add(ft.Text(f"New route: {route}"))

def go_store(e):
page.route = "/store"
page.update()

page.on_route_change = route_change
page.add(ft.ElevatedButton("Go to Store", on_click=go_store))

ft.app(target=main, view=ft.WEB_BROWSER)

Click "Go to Store" button and you'll see application URL is changed and a new item is pushed in a browser history. You can use browser "Back" button to navigate to a previous route.

Page views

Flet's Page now is not just a single page, but a container for View layered on top of each other like a sandwich:

A collection of views represents navigator history. Page has page.views property to access views collection.

The last view in the list is the one currently displayed on a page. Views list must have at least one element (root view).

To simulate a transition between pages change page.route and add a new View in the end of page.view list.

Pop the last view from the collection and change route to a "previous" one in page.on_view_pop event handler to go back.

Building views on route change

To build a reliable navigation there must be a single place in the program which builds a list of views depending on the current route. Other words, navigation history stack (represented by the list of views) must be a function of a route.

This place is page.on_route_change event handler.

Let's put everything together into a complete example which allows navigating between two pages:

import flet as ft

def main(page: ft.Page):
page.title = "Routes Example"

def route_change(route):
page.views.clear()
page.views.append(
ft.View(
"/",
[
ft.AppBar(title=ft.Text("Flet app"), bgcolor=ft.colors.SURFACE_VARIANT),
ft.ElevatedButton("Visit Store", on_click=lambda _: page.go("/store")),
],
)
)
if page.route == "/store":
page.views.append(
ft.View(
"/store",
[
ft.AppBar(title=ft.Text("Store"), bgcolor=ft.colors.SURFACE_VARIANT),
ft.ElevatedButton("Go Home", on_click=lambda _: page.go("/")),
],
)
)
page.update()

def view_pop(view):
page.views.pop()
top_view = page.views[-1]
page.go(top_view.route)

page.on_route_change = route_change
page.on_view_pop = view_pop
page.go(page.route)


ft.app(target=main, view=ft.WEB_BROWSER)

Try navigating between pages using "Visit Store" and "Go Home" buttons, Back/Forward browser buttons, manually changing route in the URL - it works no matter what! :)

备注

To "navigate" between pages we used page.go(route) - a helper method that updates page.route, calls page.on_route_change event handler to update views and finally calls page.update().

Notice the usage of page.on_view_pop event handler. It fires when the user clicks automatic "Back" button in AppBar control. In the handler we remove the last element from views collection and navigate to view's root "under" it.

Route templates

Flet offers TemplateRoute - an utility class based on repath library which allows matching ExpressJS-like routes and parsing their parameters, for example /account/:account_id/orders/:order_id.

TemplateRoute plays great with route change event:

troute = TemplateRoute(page.route)

if troute.match("/books/:id"):
print("Book view ID:", troute.id)
elif troute.match("/account/:account_id/orders/:order_id"):
print("Account:", troute.account_id, "Order:", troute.order_id)
else:
print("Unknown route")

You can read more about template syntax supported by repath library here.

That's all for today!

Give Flet a try and let us know what you think!

· 阅读需 2 分钟
Feodor Fitsner

We have just released Flet 0.1.41 with drag-and-drop support and other neat features such as absolute positioning of controls inside stack and clickable container!

Drag and Drop

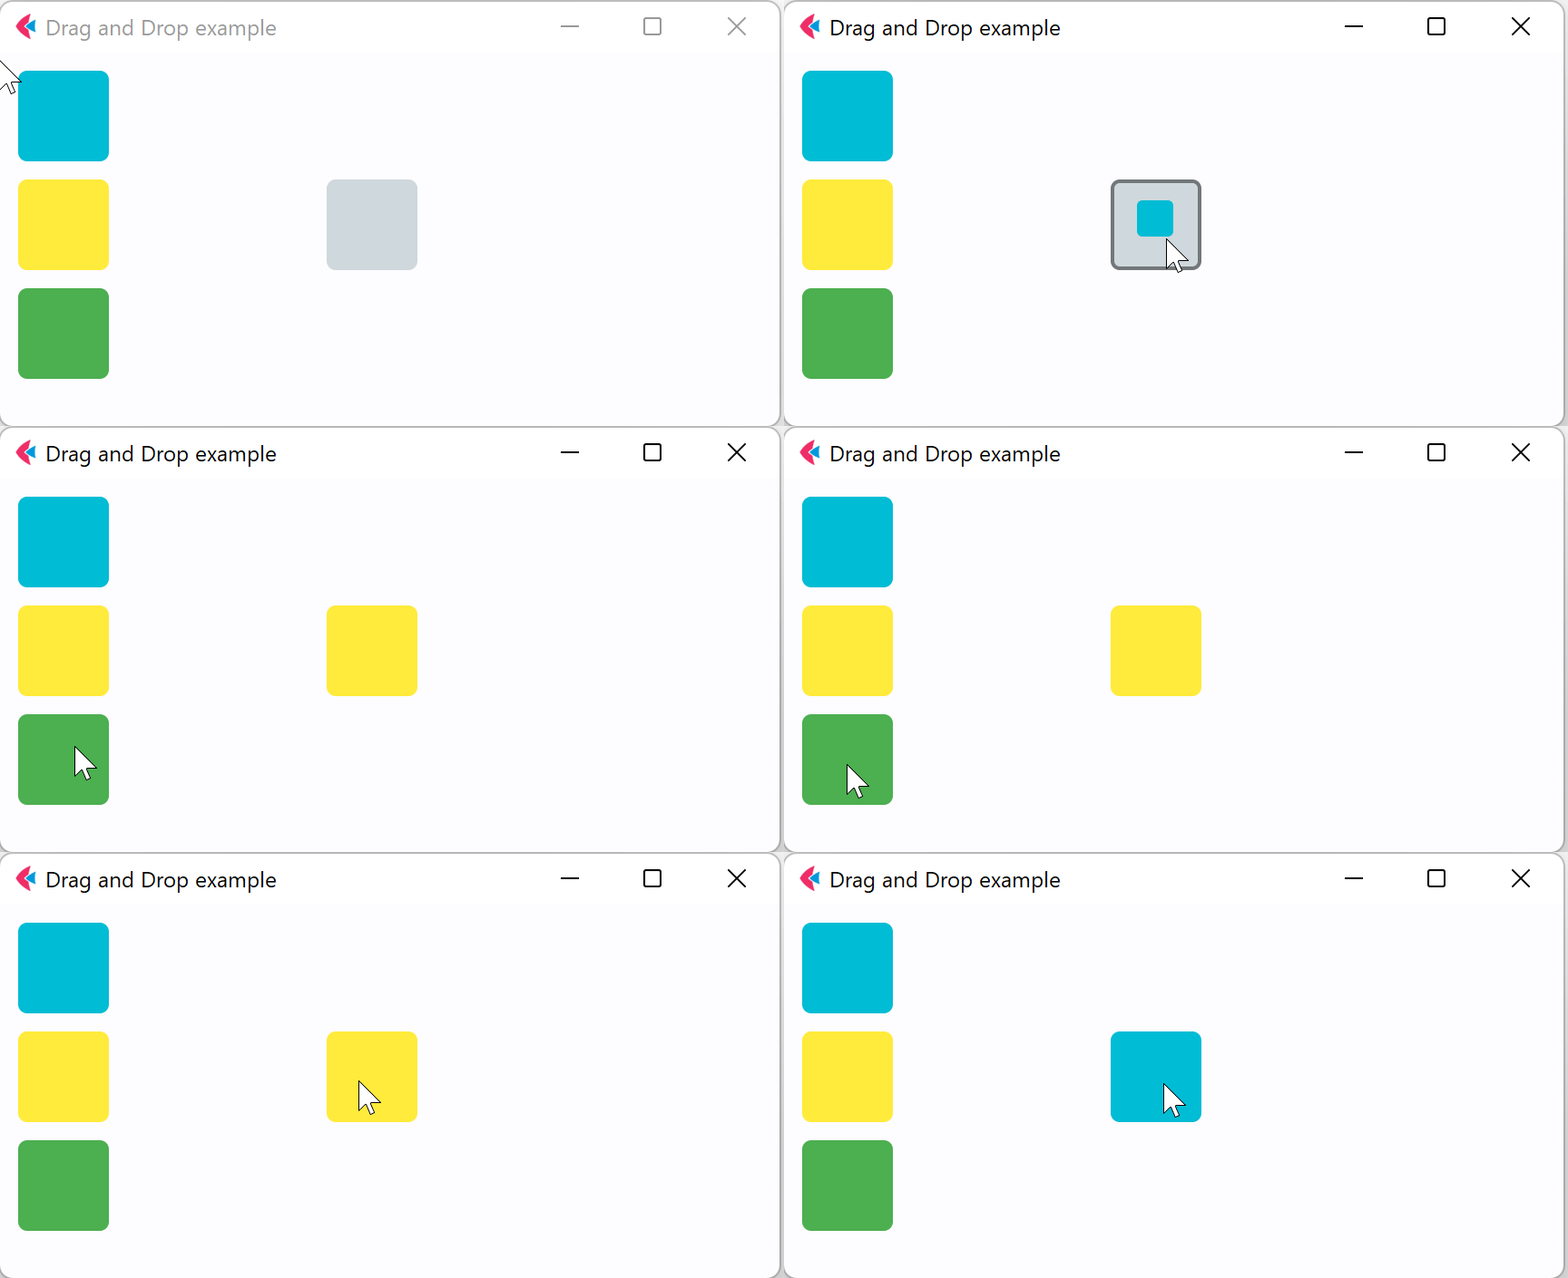
Making drag-and-drop in Flet is a real joy - thanks to a smart drag-and-drop implementation in Flutter! You just have "draggable" control which could be dragged to a "drag target" which calls on_accept event handler when draggable is dropped.

Take a look at Drag-and-Drop example.

Explore Draggable and DragTarget controls, their properties and events.

Absolute positioning inside Stack

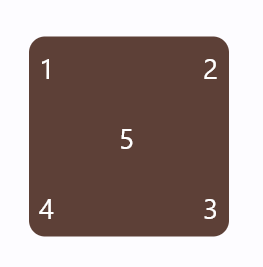
All visible controls now have left top, right and bottom properties to let them be absolutely positioned inside Stack, for example:

import flet as ft

def main(page: ft.Page):

page.horizontal_alignment = ft.CrossAxisAlignment.CENTER
page.vertical_alignment = ft.MainAxisAlignment.CENTER

page.add(
ft.Container(
ft.Stack(
[
ft.Text("1", color=ft.colors.WHITE),
ft.Text("2", color=ft.colors.WHITE, right=0),
ft.Text("3", color=ft.colors.WHITE, right=0, bottom=0),
ft.Text("4", color=ft.colors.WHITE, left=0, bottom=0),
ft.Text("5", color=ft.colors.WHITE, left=40, top=35),
]
),
border_radius=8,
padding=5,
width=100,
height=100,
bgcolor=ft.colors.BROWN_700,
)
)

ft.app(target=main)

Clickable container

Container control has got on_click event which allows you to make a button from any control and with a beautiful material ripple effect when ink is set to True!

See source code for the example above.

Give Flet a try and let us know what you think!